Showing posts with label metalwork. Show all posts

Tuesday, April 5, 2016

Poetry and Daggers

Her broken heart never mended, the shattered pieces were stored.
She went about her life but her spirit never soared
She pulled the dagger from her heart so many years ignored.
She kept it to remind herself, of how her love was torn.
Drawing her last breath, her heart battered and forlorn. 
I love you still, she whispers, though her heart has been outworn.
~~ Dana 2016

Sometimes you need to dabble a little in other art forms. It’s been years ahem decades since I’ve written any poetry and this one started out much much darker. The kiddo didn’t like the way it flowed, so I’ve been working on it tweaking words here and there. I’m not sure if I’m done with it yet, I think I’m happy with the way it reads and I may write a sister poem of him, how empty his life was without her, the regret he felt at not stopping her, we’ll see. Maybe I’ll add some artwork, watercolor maybe or just a drawing. hmm I dunno. But it has been kinda nice to switch gears for a little bit.

This is week 14 of the  Year of Jewelry project. I missed last week - life happened and I kept thinking I’d get a post written all the way until it was time to write this weeks, and I just had to admit it wasn’t getting written.


Lima Beads had these really cool looking Tibetan horns  in their newsletter and they inspired the brass dagger I made this week. Originally I had thought I’d make up an arrowhead or a sharks tooth in brass and or copper  to hang from the stingray leather I got in that awesome box from Endless Leather but somehow this dagger (could be a claw now that I look at it lol) and its matching beads seemed perfectly suited.
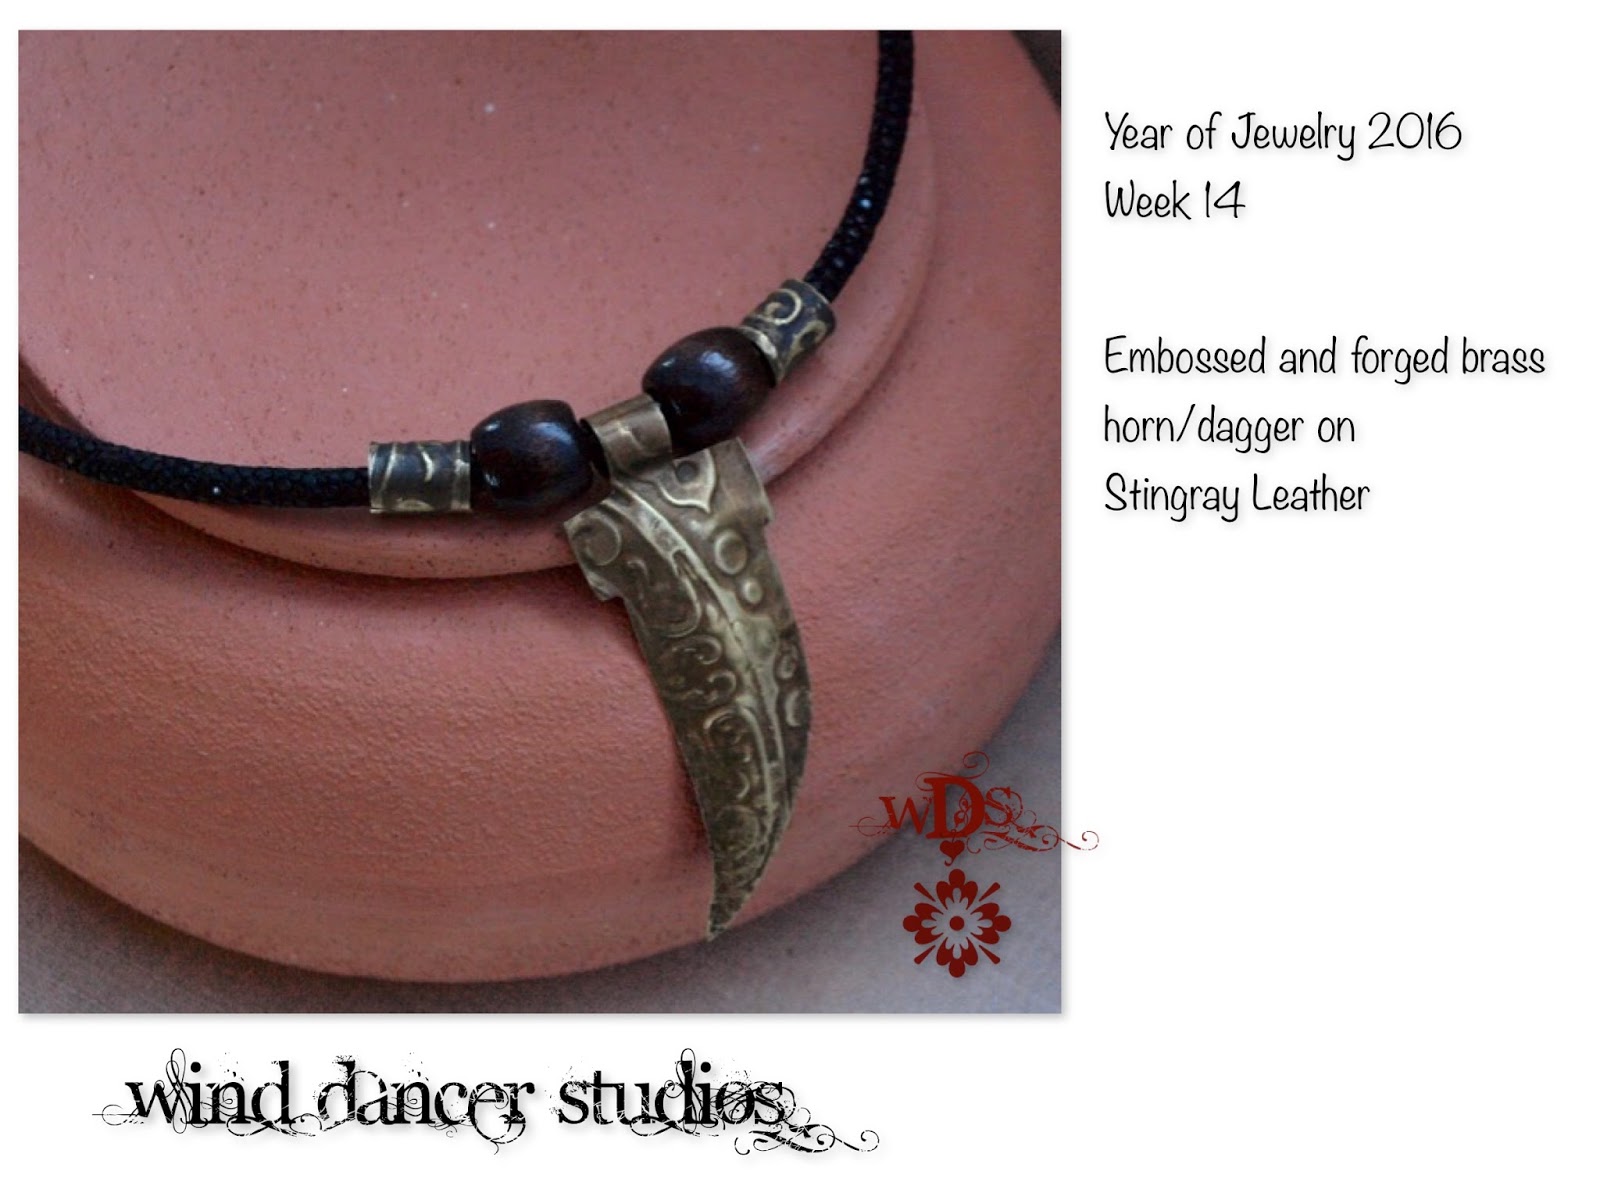
I drew out the shape on some brass sheet, cut it out, annealed it, ran it through the embosser and then started dapping and forging the curves. And of course all edges have been filed smooth as well. I actually had a lot of fun creating the dagger and it allowed me to take a breather from all the tax stuffs and deep serious conversations with the hubs. We've needed to have them and it feels so good to really talk with him again. He has always been my rock and I'm so grateful to have him. 

Thanks for stopping by!
We'll see you next time!

Wednesday, October 28, 2015

What’s on the Desk Today

Wind Dancer Studios: Captured Hearts


It’s been awhile since I’ve done a post on what’s new around here and I thought it might be a good time to share.

As you know I’ve been taking new photos of those items I’m listing on Amazon and some of those photos have found their way into their sister listings on Etsy. I have to say it’s giving me little glimpses of a look I think I really like. 

Even though both shops share listings I want each storefront to have it’s own unique offerings as well. To do that I’ve had to come up with a few pieces to put exclusively on Amazon.

So far I have some skinny bangles in aluminum and copper. While I was trying to get a decent photo of one of the necklaces I offer on Etsy I thought “maybe I should just remake this one, it’s just not hanging the way I want it to.” Which is REALLY funny because I had at least 10 good photos of it by that time! Shows you just how tired I was after taking over 500 photos lol

Wind Dancer Studios: Captured Hearts


You might remember the hubs bought me a pretty good sized baggie of gemstone hearts from an estate sale some time back. Yup, I have THE best hubs ever! He buys some really fun tools for me too!! I’ve since transferred all those hearts from the baggie to a mason jar tied with a ribbon which sits on my desk just as pretty as can be. I caught those hearts out of the corner of my eye and knew they were just the thing for a remake so I grabbed my jar…….. a hammer, my torch, and a dapping block……

Wind Dancer Studios: Captured Hearts

Wind Dancer Studios: Captured Hearts


….. and I made these! The fun thing is I can keep making these until I run out of hearts in the jar and I get a really cute necklace for my HandMade Shop on Amazon and if you want, you can even pick your heart!

I’m really happy with my Caged Hearts and you’ll be able to find them exclusively on Amazon just as soon as I get them listed.

Thanks for stopping by!

We’ll see you next time!

Tuesday, July 21, 2015

Me and the Boy - a Little Family Time

wind dancer studios, coin rings, family time
US Golden Dollar  & Quarter  Dollar Coin Rings


I've been busy but my muse has been quiet. I can make while not entirely "woohoo I so want to do this", but I prefer the woohoo. It keeps everything fun, which is why I do this. My stress levels have been higher than I thought they were I guess, I pushed hard at the beginning of the year and I enjoyed that, but I underestimated the amount of down time my muse was going to require afterwards.

So you can understand how happy I was when I told my son I was planning to make some rings over the weekend and he piped up with, "Can I make some too? I still want to learn to make some coin rings. "

And that is just what we did!

First we picked out some coins to use. He has wanted to turn his golden presidential dollar coins into rings for quite some time now. We also picked up a Quarter and a Mexican Peso. I have a Casino token around here somewhere I had planned on using, but somehow it got missed. Maybe next time!

Then we gathered up the tools needed, he went downstairs and picked up a drill and I pulled out my punch set. Marked the centers of the coins and got our holes started. Not without casualty though, I apparently opened my punch set upside down so Alex used it that way and mushroomed one of my punches. oops, ah well that's how you learn ....

wind dancer studios, making coin rings, family time
Forming the ring on the mandrel.


We used a hammer on the quarter and gave it a textured finish that is really pretty and then switched over to wood and leather mallets for the Peso and the Dollar so we wouldn't destroy the details of the coins.

wind dancer studios, making coin rings, family time
Peso Ring


We only set out to make them to fit his fingers so there are things we would probably do differently if we needed to size for a specific size smaller than that but it was a great learning experience for us both. And he hasn't taken any of them off, except for washing hands etc, since we made them.

wind dancer studios, making coin rings, family time
Wearin o' the rings, just sounds good doesn't it :)  Looks good too.

That's how we spent our weekend. How'd you spend yours? Feel free to tell me in the comments or on my page on FB. I'd love to hear from you!

Til next time!
Thanks for stoppin by!


Tuesday, April 7, 2015

How to Make Ear Wires or How Lefties Make Them - Me Anyway

hand crafted hollow bead earrings by wind dancer studios on Etsy, ear wire tutorial
Hollow Bead Earrings by Wind Dancer Studios


There are lots of ways to make ear wires and I use several of those methods myself. This is my go to method - it’s very basic and assumes you have some knowledge of working with wire and don’t need me to tell you cutters cut people too, files ruin manicures, and hammers hurt when you smash a thumb or fingernail.

I made a pair of hollow beads for the Year of Jewelry project  and thought hey! why not share how I make the ear wires for these? If my fingers look a little dirty that would be why, that and the glitter nail polish lol So I just grabbed the camera and shot photos as I worked. 

DISCLAIMER!!! I AM A LEFTIE, I use both hands when making jewelry so I don’t always realize when things might look backwards to you - if it looks backwards just mirror it and it should work out just fine! If you’re a leftie HI! isn’t it nice to know there are more of us?!

OK Let’s get started!

Step 1) Cut two pieces of 20 ga wire two inches long.

wind dancer studios ear wire tutorial step 1
I use Tronex Razor Flush Cutters I heart my Tronex!


Step 2)  Debur your ends on both ends. You can use a bur cup, fish hook sharpener or a nail file. Just file them smooth, nothing worse than sharp wires poking you in the ears. (ok maybe a few things..but…)

wind dancer studios ear wire tutorial step 2
Deburring with a cup bur
got mine at Fire Mountain Gems

wind dancer studios ear wire tutorial step 2
Demurring with a nail file 180 grit


Step 3) Straighten and work harden your wires. You can use nylon jaw pliers for this or use a bench block but I like rolling the wire between the anvil and an altoids tin or the ruler, whichever is closest at hand. There’s no curve to the wire once you’re done and it has a slight spring to it.

wind dancer studios ear wire tutorial step 3
Don't you love my baby anvil! It's so tiny!
Hubs found this one at a yard sale, my other one is 15 lbs
cast and sits on my other desk.

wind dancer studios ear wire tutorial step 3
Roll wire between anvil and ruler to straighten and work harden.


Step 4) On one end of each wire form simple loops, this will be where you add your dangle etc.

wind dancer studios ear wire tutorial step 4
Form a simple loop on one end.

wind dancer studios ear wire tutorial step 4
Simple loops, I didn't center the loops but you could.


Step 5) Take your bail making pliers and wrap both wires around the larger barrel leaving the tail longer.
You can use wood dowelling, a sharpie or a pencil, anything smooth and round.

wind dancer studios ear wire tutorial step 5
Forming wires on bail making pliers - large barrel side.
These are Bead Smith pliers.

wind dancer studios ear wire tutorial step 5
Form both wires at once so they match.


Step 6) Most people stop there but I like to go one more and slide my wires onto the smaller barrel and tuck the dangle side in for a tighter curl.

wind dancer studios ear wire tutorial step 6
Slide both wires onto smaller barrel for a tighter curl on the backside.


Step 7) At this point you can slide a bead onto the wire if you want. I like to add a little matching detail to my wire so they match my earrings.

wind dancer studios ear wire tutorial step 7
Adding a bead for color.


Step 8) Now grab the wire just behind the bead and give a little bend to help hold the bead in place. This also balances the wire a little bit so your dangles hang straight down.

wind dancer studios ear wire tutorial step 8
Securing the bead in place.
I'm using Wubbers Chain Nose pliers.


Step 9) Place your ear wire on the anvil or bench block and give the backside of the curve a little tap. This hardens the curve and helps it keep its shape. Some people don’t like the flattened wire, especially with a heavy earring, to keep the wire round use a rubber mallet or a leather mallet instead. Both will harden your wire without distorting it’s shape.

wind dancer studios ear wire tutorial step 9
Hardening the back edge. I'm using a finish hammer,
it has a slightly domed smooth face with no hard edges.
Sometimes I steal the hubs MAC chasing hammer
for auto body work, it has a much smaller head, great for
precision work!


Step 10)All that’s left is to add your dangle and voila you have just made your own ear wires.

wind dancer studios ear wire tutorial step 10
TaDaaa!
hand crafted hollow bead earrings by wind dancer studios on Etsy
Hollow Bead Earrings by Wind Dancer Studios


Please excuse the stacked trays in the background, I just realized they were there lol I was using those to keep my components together as I worked on my Muchas Musings Lines. They allowed me to keep components with the sketches so I wasn't constantly looking for where they went. Take out tubs are AWESOME for this, lids and see through.

I hope you enjoyed seeing me make these and if you did please leave a comment. 
Comments will encourage me to retake those photos for the rose tutorial......

Thanks for stopping by!
We'll see you next time!


Tuesday, October 14, 2014

Playing with Fire and Leather

It's been a bit busy around here this last week and as a result I missed my blog post. Busy is a good thing around here though and I am not complaining!

I played a bit last week. Picking up scraps of this and that, little bits of things I twisted up, sawed off, and bought. Put flame to some and wire to others. All in all a productive week and I enjoyed myself to boot!

Originally I had thought I might just play with an idea I got from this tutorial over on the House of Gems Pinterest board. I had two pieces of leftover copper I had sawn off another project and I thought it might be fun to dangle some chain from them.

Since I was playing, I thought why not emboss them? They're a slightly heavier gauge metal so I knew I'd have to anneal first. I lit the torch and thought.... why not play a bit with fire painting, I have to torch it to anneal it anyway. (You're getting a real good look at how my brain works here) So I torch and get some really pretty purples YAY! And I emboss and get great matching imprints for a pair of earrings. Next up we'll drill holes to hang the chain from. Zip zip zip and done woohoo.

I'm really liking the iridescence of the purples.............. I think I have some daggers with that color.
Yup! Then I notice a little piece of wire I had looped up and it fit so nicely into the arc of the shield, so I made another and I really liked it. At this point no matter how I played with that chain I just didn't like it. Too bad too, I had planned on suspending the whole thing from that chain....hmmmm

I really like the rib bone chain I made for my Dia de los Muertos piece and the bars Dana sent for bead soup... I could make some bars to hang these from! So I did....  I played a little too long before sealing so I lost a bit of the deeper shades but they're still really pretty!

flame painted copper shield earrings
Flame Painted Shields


Next up I decided to play with my leather scraps. Rebeka Payne of Tree Wings Studio has these leather feathers that I absolutely adore, I though I might play some and make my own feathers. I even got the kiddo in on it and gave him a piece of leather to play with while I cut and designed a few things. He LOVED it!  and I loved it.

The color of the first feathers I made were the exact shade of the stone I've been playing with the woven bezel for the last couple weeks and I just happened to have one wire left I had no idea what to do with, and tadaaa!

Copper and Leather Wrapped and Woven
Alex claimed this one just as fast as I was able to get those feathers on it.
I've made up several more feathers and have many more ideas for them already. 

Thanks for stopping by!
We'll see you next time!


Tuesday, September 30, 2014

Trees and Branches

It seems I've been on something of a tree and branch kick lately. Must be wishing for the cooler temps of Autumn and the colors it brings as I seem to have also been in something of an orange mood too. More of a pinky/coral orange than a pumpkin orange but still an orange.

pearl & coral necklace with copper cherry blossoms
FW Pearls, Peach Coral & Copper Necklace
Instead of a full on Tree of Life this time I opted for a branch of twisted copper cherry blossoms.
This one is something of a convertible, being wearable at different lengths. The vintage style hook closure allows for an 18 inch length when hooked at the first cap, a 22 inch length when hooked at the flower and a 25 inch length when hooked at the end of the extender. I love the soft colors of the coral I got from House of Gems and how sweet it looks combined with the FW pearls I picked up from Fire Mountain Gems recently during their Dutch auction sale. Perfect as we head into fall and will still be awfully sweet when he head into spring.

copper end cone cut lines


I took pics as I made this one thinking I might do something of a tutorial. Then I found this paper plate cookie basket tutorial by One Good Thing by Jillee and darn if it wasn't exactly what I did to make my end "cones" well minus the tape!

One Good Thing by Jillee
*I punched mine out of copper and ran them through the Big Kick to match the cherry blossom focal first.
*I used my flat nosed pliers for spacing and marked the back side with a sharpie so I knew where to cut to. 
*Punched a hole dead center then followed the fold and cut pattern to make the box. 
*Instead of cookies we have crimped bead ends on an eye pin inside a nice neat little open ended copper box that matches the focal, giving it a special one of a kind touch. 

Isn't it fun to think outside of the "box"?! These can be made to any size you need. I love taking techniques I learned from other crafts growing up and applying them to jewelry.  This will even work for a flower petal bead cap if you use a smaller circle or a larger bead. Just be sure to file those edges and corners, they can be a little sharp if you don't.


Thanks for stoppin by!
Feel free to post any "Out of the Box" techniques you use in the comments.
See ya next time!

Tuesday, July 22, 2014

A WISH for you! A WISH for me!

Wind Swept Fairy w/Dandelion
Found on Pinterest

I was surfing around on Facebook the other day and found this absolutely gorgeous "wind dancer" She spins in the wind, just an awesome find and I was immediately enamored. I love everything about her (except her toes, they're too long but that's just my sense of aesthetics) anyway toes aside she's perfect. So I poke around the page and marvel at all the sculpture, it makes me want to touch. To stand and stare and caress the lines. Yes folks, in my little art world that is LOVE. The need to touch and feel, to see and smell. To bask in it's glory.

Fantasy Wire on FB
A single Dandelion Seed
Then I come across these. Oh my........ I can afford this. I want this. I need this. It's a what? A wish?


This is a WISH
Found here: Bits and Pieces


No no no. THIS IS A WISH! I have absolutely no idea what plant it comes from. But all my life I've known THIS to be a wish. It's about an inch to an inch and a half in diameter and no stem.  Just a little smaller than the photo suggests, but not much. You catch it blowing about on the breeze. Hold it very gently in your hands, so as not to crush it. Make your wish, and release it back onto the breeze. It's very magical when you're a child and I haven't seen one in years, not since my own children were small when I showed them how to catch one and release it.

Oh, You *can* make a wish on a Dandelion, my kids did it quite often! So did I. How many breaths it takes to blow the seeds away is how long it takes for it to come true, sort of like birthday candles. But in my world, it isn't a wish any more than a star is, it's what you make a wish on.

Nevertheless, I do love this dandelion seed. I may just have to buy one. Or at the very least make one for my desk. I have a small fairy sculpture in my garden and my daughter has an abstract sculpture started that she wants to place in my garden. I think a fairy shoe and another fairy or two are definitely in order, maybe even a dandelion seed. Then I can wish that someday I might own a sweet little "wind dancer" of my own.

Thursday, April 17, 2014

I've gone Toothless!


Really I have! No, no, I still have all the teeth in my head that I had yesterday..... My pliers have lost their teeth! Yup they've grown up!

The yellow pair were my very first pair of pliers. When I was 16 and had just gotten my drivers license, the very first thing I did was drive to the mall. No surprise, I was 16. But I didn't drive to the local mall, no I drove to Sun Valley Mall. They had a bead store, Bead something, it's been so long now I forget the name but I loved that store it was pure joy. Chain, beads, findings, tools....happy sigh. I don't have a bead store local to me now either sigh, I do have a Hobby Lobby and a Wal Mart, but it is just NOT the same. I bought those first pliers on that first solo trip to the mall along with some beads and chain, I still have some of those too, but will save that post for another day.


As you can see in the close up those little yellow pliers were toothed. Toothed pliers are what I learned on all those years ago. I had egg shaped loops quite consistently and some scarring of metal on a regular basis too - death grip will do that.

The red and black pair my hubs picked up for me at the hardware store some 10-12 years ago.  I was making some wire baskets from fencing and needed a better grip. At that time I was just starting to work with wire as a primary component rather than purchased head and eye pins. As you can see they too are toothed. But by this point I was making round loops pretty consistently :) though an egg does sneak in from time to time and scarring does occur if I get frustrated and grip too tightly. Thankfully, those are rare occurrences these days too.

Death grip is the main cause of scarring metals, as you can see I've used toothed pliers exclusively for a lot of years and I don't have a lot of scarring in my pieces. On those rare occasions I do, I file and buff them out but that does take time too and eliminating the teeth would go a long way in eliminating those last bits of scarring. So I made the decision to buy toothless pliers, not going to lie, that was a scary decision. I've been using toothed pliers for a very long time and I wasn't entirely sure I'd like going toothless.

Rather than plunking down $50 or more for Lindstrom, Tronex, or Swanstrom I went middle of the road. I have never heard a bad word about Wubbers, in fact it's been all good and trusted I would have the same experience.

Sadly, this last week has been crunch time for taxes and I've been dealing with new software and trying to hunt down missing categories..... ahem can we say operator error, I really need to delete unused categories so things don't keep going awol...... as you can see that meant no real time to play with my new toy. I did however, pick up a piece of wire and squeezed the life out of it - um it flattened, and then it made a very pretty round loop..... no scars, none. NONE!

I think i'm going to like having gone toothless, I think, I'm going to like it ALOT! I am really looking forward to having some playtime this week!!

Thanks for stoppin' by!
We'll see you next time!

Tuesday, November 19, 2013

Torn and Tattered


I’ll let you in on a little secret. I don’t have TV. Well, I have a TV but I don’t have cable or satellite. I have a pair of rabbit ears and I live in a pretty rural area surrounded by mountains so reception is iffy at best. Signals going digital actually killed the reception I had. Before they went digital I could pick up nearly as many channels as our local cable company offered so when I got fed up with paying money for a lack of service there was very little pain involved. We watched more movies than TV anyway so when the signals themselves went kaput that wasn’t even a big loss. Then I installed NetFlix, originally for the movies but soon learned we could catch up on those shows we actually missed. Shortly after discovered one or two new ones. Followed by the realization the ones we really liked that still air can be viewed online!

I WAS working on one of my UFOs, I had coiled up some brass to make up some jump rings and my blade got dull while I was cutting them. Thrilled I had dulled a blade before breaking it I put a new one on the saw. Then applied way too much pressure. The old blade was very dull and I didn’t realize how much pressure I had been using to get it to cut the rings… and then the saw slipped and found my fingertip. Ouch! After a second time and actually managing to draw blood I knew I needed to take a break. I only had a couple rings left to cut so I used my cutters to finish off the coil and decided to watch a little SuperNatural while I closed all those rings I just cut. The angels have fallen to Earth so the opening credits now feature some very tattered wings, the graphics of which I find beautiful.

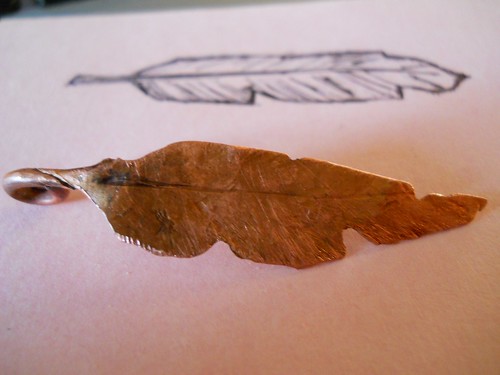
Once I finished closing up all those rings and had them in the tumbler the kiddo and I had a Once Upon a Time mini marathon - I promised I wouldn’t watch without her and she’s been busy so we had a couple episodes to catch up on. Thoroughly in a fantasy set of mind after all that and a saw just sitting there with a brand new blade in it I quickly sketched up a tattered feather. Pulling a piece of scrap from the jar I got to work using my sketch as a reference. One of these days I may actually lay a pattern on the metal itself :) but so far I like free handing and I’m starting to get a good feel for the saw and what it can do.

Untitled


This is the result, one tattered and torched feather. I loved the coloring I achieved when I annealed the quill to make the self bale so I left it and just burnished the edges so they wouldn’t be sharp. Measuring 2 inches tip to tip and just 1/2 inch at its widest, I’m pretty happy with it.

Thanks so much for stopping by!
We'll see you next time!

PS First image belongs to the photographer Philip Bonneau
and can be purchased here: https://www.etsy.com/listing/97495704/heroesvillains-issue-1-print-1