Showing posts with label torched. Show all posts

Tuesday, April 19, 2016

of Torches and Rings

Thank goodness for the Year of Jewelry project. I’m feeling less than chatty and like I have no words again this week so it’s Year of Jewelry to the rescue.

Magpie Approved: OUCH
Thank goodness for Lavender Oil

If you follow me on Instagram you saw the burn on my thumb. I was a little careless and lost in thought rather than paying attention to the location of my hand. Ouch. A little lavender oil and my thumb healed up beautifully. 

Since then I’ve noticed my torches flame is flowering. My awesome son cleaned the tip for me but that didn’t completely solve the problem. I switched over to using my butane torch but it has always been hit or miss. (I think it was a bit of a lemon) My son being the wonderful kid he is, went out and bought me a new tip. My husband being the loving man he is, went out and bought me a new butane torch. I was one Happy Camper!

Wind Dancer Studios: Sterling Silver Band

So this weeks post brings to you a simple band of sterling silver. Lightly textured and soldered with the new torch.  And the Kiddo claimed it immediately as payment for the modeling session!! Ha!  I need to steal it back for a few photos to create a made to order listing. She wears it stacked with another ring she purchased and they look beautiful together.


Sterling and Ruby in Fuchsite


I also shared on Instagram a pendant I had made a few weeks back. I dropped it and the cab/bezel popped off. The new small torch went in and tacked it right back in place!! This one has a good solid pin point flame the other one never had. The hubs did really really well!

That's about it for the week!
Thanks for stoppin by!
We'll see ya next week!

Tuesday, August 19, 2014

My First Spinner/Fidget Ring


It's been a torching kind of week around the studio as I've been working on a pair of commissioned earrings. Sometimes when I get to a point where I'm really happy with the progression of a design I need to take a step back and work on something else. Sounds a little backwards doesn't it?

Honestly when I'm really happy I feel the need to psyche myself up to take the next step when it involves the flame. Fire melts metal. I know this because that's how I make all those balled headpins.

This weekend as I psyched myself up I made several rings, a couple twisted copper rings and my first spinner ring. I have a chart around here somewhere that gives lengths and ratios and all that really necessary stuff for getting the proper fit but I didn't pull that out, noooo I had to wing it! Which really isn't as bad as it sounds, I have a pretty good memory I just didn't remember the difference in length between the wide band and the spinner band so the first band was too small and the second tried to scare me by sliding off as I checked the flare haha! Bad spinner!

Even though I managed to split the seam a little, just as I was finishing up flaring the band, I am really happy with the results. Alex has claimed this one for his own, I wore it for awhile and it really is pretty comfy to wear and since I do fidget with my rings it was right up my alley.

What about those earrings you ask? Well, my fear of melting something is actually well founded. I got the first earring put together and started soldering the second. I got too aggressive with the flame and poof she melted. So now instead of having a pair of gorgeous earrings, I have a very cool pendant. I'll start pair number two here in just a few. Plan B involves no flames, I think I'll work on those first and then maybe I'll come back to Plan A. After all, a full set would be really pretty!

Thanks for stoppin by!
We'll see you next time!

Saturday, May 10, 2014

Bead Soup Blog Party #8 Reveal Beckoning Bohemian

Welcome to Bead Soup Blog Party number 8. The reveal date has finally rolled around and I am excited to show you all that I have made. This is my fourth time participating in the party and I have found it every bit as inspiring as the first, second and third times. This year my partner is Dana James, I wrote a quick blog post introducing her to you here.


She sent these wonderful soup ingredients that just called Bohemian to me, and when I say called I don’t mean whispered. My muse was very clear this was the direction we were taking, and then she went into creative overdrive…………

Together we made armloads of bracelets.

memory wire bracelets/anklets, colorful bangles, copper & leather cuff


I had never played with memory wire, can you believe it? The stuff has been around for nearly as long as I have been playing with beads and I have never even touched the stuff. Not even once. I had in my mind’s eye stackers. armloads of pretty. I started with the teals, inspired by those gorgeous blues in the lampworked beads. Added those sweet sweet floral head pins and Hey, as long as we’re making stackers, let’s play! I grabbed up many feet of aluminum electrical ground wire riveting the ends together and wrapping the resulting o’s with yards of colorful threads and pearls, adding beads and bells for loads of super lightweight, super colorful, super happy bangles. Super right? We were going to town making these fun little things and it dawned on me, I hadn’t touched a single soup bead since bracelet number one - gasp! Never fear my dear, these are meant for stacking together!!
Returning to the memory wire this time I worked in earth tones picking up the subtler colors in those gorgeous lamp worked beads.

Ready to get in some metal work I made up some textured copper strips and wrapped up some leather fully intending to use one of the clasps Dana had sent. But when I was ready for it, the clasp just didn’t seem to work, sigh. Not one to argue with my muse I finished the clasp using a piece of the leftover copper and textured it so that it matched beautifully. 

I remembered I had this great little bracelet wire from the Bead n Button design challenge that I hadn’t gotten around to using and what better way to showcase one of those lamps than that? I added a stamped filigree, a little flower with crystal center, and a Czech picasso leaf. Just sweet!


Then I made some connectors and played with those cool little copper bars and beads Dana sent. They looked really good with the larger lampworked beads and bracelet number 14 was born. This time I did use one of the clasps Dana sent :)

I had sketched up a design for the focal and ordered the bits I needed from B’Sues. I finished out the detailing while waiting in the lobby at the Drs office while the hubs was getting his eyes dilated. I had planned on etching the mehndi style designs but all I managed to do was discolor the metal ;/ hmmm


While I contemplated discolored metal I formed and forged some frames then wrapped up a couple pair of earrings. I LOVE these earrings. The first pair have Cognac hydro quartz and matching crystals from the soup stash and the second feature those sweet peach pearls Dana sent.

Brass choker - lace & flowers in brass and copper


Back to work on the focal I decided I would engrave it instead. Using a dremel and very slow speeds I did something I thought I could not do, I engraved a straight line. Seriously, I once answered a question about engraving with a no you can’t use a dremel, you need special tools……. ahem I stand corrected. ( I think I might really want those special tools now though - engraving is kinda fun!! )

So I engraved not just front but back. Riveted vintage opals and wired the brass lace into place. I added hand made flowers again with crystal centers and a short length of crystal beaded chain.

At this point I thought I was done. I had very little soup left, bullet casings, crystal points, a clasp, pearls and crystals. I so wanted to make one of those cool bullet casing points but the points are 1 mm too big ONE. The hubs says you just need to stretch the casing. LOL That’s all….. the muse leans over and says I have an idea…..

brass and copper dragon entwined around a quartz crystal point


….. and a dragon was born. The focal piece was my favorite up until this point. Pun not intended! I wrapped the point in a strip of engraved brass, followed by a woven strip reaching up behind into wings. At least it did. I didn’t like the way the one wing was sitting. I thought it was too low. I’m using brass, brass is a fairly hard metal and is brittle when work hardened. I gave a slight bend to the wire, and snap! off came the wing. I had to take the whole thing apart and rework the game plan. This is one of those times when uh oh is truly to your advantage. I made a second pair of wings and sawed a new head added vining swirls to the end of the bale to make the back as interesting as the front and wow! Even my son loves this guy. And look….. the second clasp found its way in too!

At the time of this writing I still have several days until reveal……… I wouldn’t be surprised if another little something found its way into this post as my muse doesn’t think we’re quite finished yet :D

As I was saying with the delay I had several extra days to play! And play I did, I finished up two UFO's you can see that post here (fortunate I did too, as I needed a blog post lol)  AND look at that! Two more pair of earrings found their way into the blog party!

forged and wrapped brass hoops, woven and scrolled brass copper and smokey quartz dangles

First pair is a simple forged pair of brass hoops wrapped with a peach pearl and the second woven and vined brass and copper with smokey quartz and crystal.

I still have quite a few ideas swimming, seriously inspiring this round, BUT it's only a few hours away until reveal. Yesterday was the hubs birthday and Mother's Day is this weekend. I think I'll play with my muse again in a couple days, right now I think I'll spend some quality time with my family and start hopping bright and early - or after I've had a couple sips of coffee  and can form coherent sentences!  :)

We have close to 500 participants again this year… wow! Make sure to visit Dana’s blog  to see what she made with the goodies I sent her (that’s where I’m headed first!! ) then head back to Lori’s blog Pretty Things    to catch the rest of the hop!

And if you'd like to peek at my past soups you can always visit these pages

Bead Soup 5
Bead Soup 6 
Bead Soup 7


Thanks for stoppin by!

We’ll see ya next time!

Thursday, April 24, 2014

Stacking Rings - I've FINALLY done it!

I've mentioned before I wanted to learn to make stacking rings, I love the little things. I love that you can stack them or wear them with other rings or just singularly. Options are ALWAYS a good thing in my book. I posted I had begun trying my hand at them, back in February I believe it was errr make that November! lol, but felt I still needed a fair bit of practice.
By George I think I've got it! Stacking Rings!

Last night I was working on the main piece for my Bead Soup. I was using some aged brass wire and wondering why I had it and what would I have been using it for. Just as I was nearing the end of the wire it dawned on me, I had set aside a pair of earrings I was working on to to focus on books and such and I had just used the wire I made up for those earrings - face palm!

I broke out the torch and patinated several feet of wire as now I had at least two projects needing it. I thought to myself while I've got the torch lit, maybe I could practice a little more on making stackers. This was my result 5 count 'em FIVE rings all US size 7.5 with varying degrees of texture. I am so stoked! I can make them and they're pretty! I think the next time I order wire I'll make a purchase of some heavier gauge silver, maybe gold filled too! Look for stackers to start making an appearance in my shop soon!

Tuesday, November 19, 2013

Torn and Tattered


I’ll let you in on a little secret. I don’t have TV. Well, I have a TV but I don’t have cable or satellite. I have a pair of rabbit ears and I live in a pretty rural area surrounded by mountains so reception is iffy at best. Signals going digital actually killed the reception I had. Before they went digital I could pick up nearly as many channels as our local cable company offered so when I got fed up with paying money for a lack of service there was very little pain involved. We watched more movies than TV anyway so when the signals themselves went kaput that wasn’t even a big loss. Then I installed NetFlix, originally for the movies but soon learned we could catch up on those shows we actually missed. Shortly after discovered one or two new ones. Followed by the realization the ones we really liked that still air can be viewed online!

I WAS working on one of my UFOs, I had coiled up some brass to make up some jump rings and my blade got dull while I was cutting them. Thrilled I had dulled a blade before breaking it I put a new one on the saw. Then applied way too much pressure. The old blade was very dull and I didn’t realize how much pressure I had been using to get it to cut the rings… and then the saw slipped and found my fingertip. Ouch! After a second time and actually managing to draw blood I knew I needed to take a break. I only had a couple rings left to cut so I used my cutters to finish off the coil and decided to watch a little SuperNatural while I closed all those rings I just cut. The angels have fallen to Earth so the opening credits now feature some very tattered wings, the graphics of which I find beautiful.

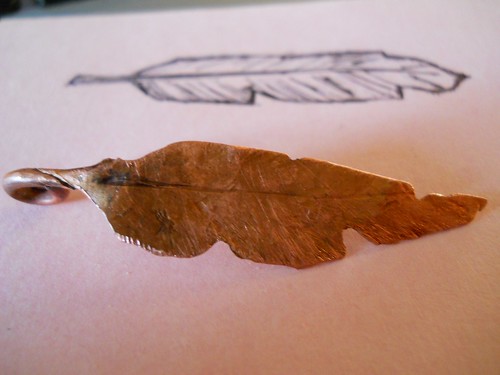
Once I finished closing up all those rings and had them in the tumbler the kiddo and I had a Once Upon a Time mini marathon - I promised I wouldn’t watch without her and she’s been busy so we had a couple episodes to catch up on. Thoroughly in a fantasy set of mind after all that and a saw just sitting there with a brand new blade in it I quickly sketched up a tattered feather. Pulling a piece of scrap from the jar I got to work using my sketch as a reference. One of these days I may actually lay a pattern on the metal itself :) but so far I like free handing and I’m starting to get a good feel for the saw and what it can do.

Untitled


This is the result, one tattered and torched feather. I loved the coloring I achieved when I annealed the quill to make the self bale so I left it and just burnished the edges so they wouldn’t be sharp. Measuring 2 inches tip to tip and just 1/2 inch at its widest, I’m pretty happy with it.

Thanks so much for stopping by!
We'll see you next time!

PS First image belongs to the photographer Philip Bonneau
and can be purchased here: https://www.etsy.com/listing/97495704/heroesvillains-issue-1-print-1