Showing posts with label MagpieApproved. Show all posts

Tuesday, December 29, 2015

New Year’s Hopes and Contemplations


The countdown to 2016 is upon us so like many of us, I’ve been contemplating what I want to accomplish in the coming year, and taking stock of what I’ve accomplished so far.

As I ruminate on this, I’ve decided I need to figure out what my idea of success is, if it’s still the same or has it evolved? When I first started selling, my idea of success was to sell enough to reinvest in more gemstones and tools. That evolved into creating a more consistent sales pattern. Which evolved into defining and developing a cohesive line that allowed me to play with different skill sets and price lines. In these regards I have been very successful. I’ve set and met my goals, exceeding in some areas and refining what still needs work.

Since opening the “doors” at Amazon’s Handmade Marketplace, I’ve been deliberating on my ideas of success and have decided it may just be time to set the bar a little higher. I like Amazon, a lot. I like the business lay out, I like how straight forward things are, I like how it makes sense to me, I like how it even makes Etsy clearer for me. I believe Amazon will help make me a better seller on Etsy and I look forward to the coming year on both selling platforms. I truly believe this is going to be a very good year!

As far as resolutions go, I generally set goals and map out plans for them all year long re-evaluating as necessary and adjusting accordingly. Where last year was about photos and tags, this year will be about book keeping and inventory, exciting isn’t it? 

I lost my inventory data when my desk top died and I started rebuilding it some time ago but that stalled out. I just recently lost a decent sale when I didn’t have the inventory on hand to complete it. That hurt, I need to know what materials I have on hand and reorder when low so that doesn’t happen again.

Book keeping is boring but I constantly have a stack of receipts to file and that just needs to be addressed, I used to be on top of these things. Part of that is just not really liking the software I have and the resulting procrastination. I need to just get over it OR find new software, I’m leaning towards new software.

Other than that it’s just building a cohesive shop on Amazon and keeping a decent balance of items in my range. As well as developing a nice clean look in Etsy so both market places have similar looks. This should also streamline my photo process for me which is a bonus really.

As I read over this I’d have to say I have a recurring theme for my goals this year.  I’d say the word of the year is Efficiency.

Efficient: adjective: working in a well-organized and competent way
: organized, methodical, systematic, logical, orderly, businesslike, streamlined, productive, effective, cost-effective, labor-saving. ANTONYMS disorganized.

hahaha yes I am a Virgo why do you ask?!  Yes, I did just reorganize my pantry…… and cupboards……umm no I’m not a neat freak, the dust bunnies would thank you not to put that particular idea in my head lol  I just like things where I can find them easily so I can make a mess with them! Including numbers, because lets face it - taxes and inventory need to be seen at a glance and the less work it takes the better.

I do have other goals as well but they revolve around family and the house. I’ll probably share those later in the year as things get done. Knock wood  😊


What say you? Any wonderfully wild plans for your year? Fun things or serious? Goals Hopes Dreams Ambitions? Share them here if you're so inclined.

Tuesday, October 6, 2015

of Photography and Neutral Backgrounds

MagPie Approved: the art of Juggling and Keeping it all up in the Air
MultiTasking the To Do List


With the pending launch of Amazon’s Handmade I’ve  been up to my ears in retaking photos for those pieces I intend to offer.  My camera died just in time for Amazon to give the thumbs up for setting up shop.  The kiddo as you know graduated Fine Arts with a focus in ceramics, but she started out a photo journalism major. The kid has a camera! Kiddo to the rescue, this is no point and shoot and I have zero familiarity wth it. She set it up for me, showed me how to manually focus and was gone. Some 200+ pics later the battery needed recharging and that leaves me time to write this, and descriptions and SKU’s and sort through possible posts for my FB page— multitasking getting just a little bit of everything done all at once lol

MagPie Approved: Wind Dancer Studios Green Dangles, Amazon Handmade
Long Green Dangles


Amazon has asked for white to neutral backgrounds no props. Neutral no props is not a problem, I’ve got antique linens, burlap and hand thrown pottery (kiddo again!) that serves quite nicely. 


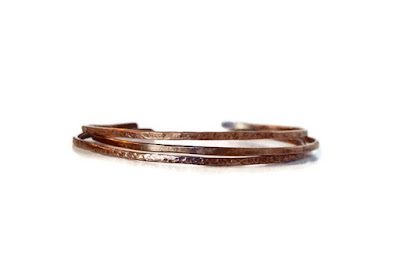
MagPie Approved: Wind Dancer Studios Copper Bangles, Amazon Handmade
Wind Dancer Studios: Copper Bangles

White however, takes quite a bit more work. I’ve got a poster board that makes for a great back ground but it has a slightly reflective surface and a purple shirt during the photo shoot makes a pretty water color effect but…. I’m looking for a uniform white.

I managed the sliders well enough to get some of the photos to cooperate when Marica mentioned Foto Fuse. As we discussed it I realized  it works much the same way as PS Elements does using the magic selection tool and a paint bucket. 

MagPie Approved: Wind Dancer Studios Black Dangles, comparison editors
Photo Editor Comparisons


In the true form of an artist facing pending deadlines I researched all three methods for the better part of an afternoon. The kiddo observing this and now has a healthier self esteem - Mom does it too! lol  Here’s what I found:

I’m on a Mac Book, iPhoto was the photo software installed for many years, the newest updates are Photos minus i. It brought back some of the functionality that was lost along the way and just takes a little play time to figure out what each slider does and doesn’t do.

If you take the time you can create a very natural white background with soft shadows and a hint of reflection.

PS Elements,  I’m still running 9, is much the same however shortcuts and time savers were what I was hoping for so I elected to use the magic wand to select the jewelry then a paint bucket of white to douse the background. That worked great! Only problem is it’s fairly resource intensive and tends to unexpectedly quit after just two or three photos. There is a tool that works just like Foto Fuse for deleting backgrounds, I just couldn’t remember what to click to get to it.

Foto Fuse allows you to upload a pic, or import it from Etsy (spent a little time playing with that feature too!), hi light the area to be saved and deletes the background. With a little adjusting of brush sizes this works very nicely. Sometimes it looks a little unnatural but overall it’s the fastest method and is a good alternative when facing a time crunch.

I’m using a combination of the two. If I can get a natural white with Photos I’m good, but if it still has a hint of cast to it off to Foto Fuse it goes. I do actually like the water color effect so I’ve kept a copy of those as a secondary photo.

As for the product in use for size reference photos - the kiddo has stalled in her promised life size portrait for me….. she doesn’t like the size of her mouth, the one she drew. So I’ll wait until she does.

I’m off to write descriptions, create SKU’s and maybe make a few things as the battery is still charging. 

Have a great day!
Thanks so much for stoppin by!

We’ll see you next time!

Friday, September 25, 2015

Change it up Blog Hop


Wow! I was beginning to think I wasn’t ever going to get this finished! I couldn’t seem to get started, I kept getting interrupted or frustrated so it took days to make and then just as it was all finally starting to fall into place, my camera died. Right after taking a couple of the most gorgeous clear pictures it has taken in a very long time. Well, since it went for a swim in my coffee anyway.

The bright side is I discovered that little slot on the side of my laptop that looked like it might be the right size for a memory card, is in fact the right size for a memory card! It seems not all the photos saved but I did get the photos that had saved uploaded! Yay! 

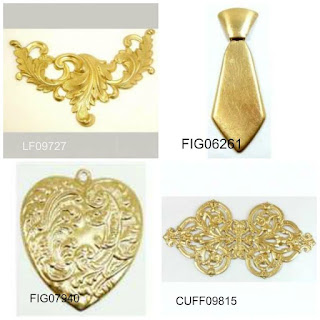
Just in case you aren’t aware, here’s how this hop works. Brenda Sue of B’Sues Boutique has given us a choice of four items to play with.  These cuties:


MagPie Approved: Wind Dancer Studios / B'Sues Change it Up Blog Hop Choices
Change it Up Choices


Our job is to look at them from a different perspective. cut them up or use them in a different manner than you normally would. Keeping the months challenge theme in the B’Sue’s FB group in mind. Septembers challenge btw is Vintage.

I chose the cuff in the bottom right corner.  I don’t normally do cuffs, in fact the only cuff I’ve ever made was for the Build a Line Challenge in the beginning of the year.


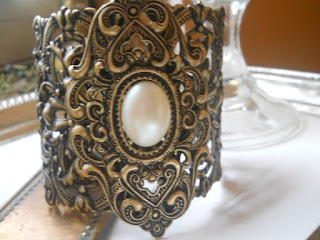
MagPie Approved: Wind Dancer Studios Muchas Musings Cuff
My Cuff from Build a Line

 
First challenge, what the heck am I going to make with it? I’m actually ok with making a cuff with it because, I don’t usually make them so for me that is different but I can't just form it, that isn’t really out the box. I thought to myself, Oh I have a piece of Prehnite that would make a great focal, I’ll use that!

MagPie Approved: Wind Dancer Studios Prehnite
Prehnite Pendant


So I cut the filigree in half intending to create a focal with the Prehnite.

Challenge number two…….. the Prehnite is curved both front and back. The cuff would also be curved….. in the opposite direction. No matter how I worked it in my head there was too much air between the stone and the metal. So there I sat, with a cut up piece of filigree, a stone that won’t work and a piece of brass I had intended as a back plate. What to do what to do?


MagPie Approved: Wind Dancer Studios Prehnite Pendant Idea
Not going on the cuff, but Hey! This is a cute idea!


I’ll emboss it! But it needs to be annealed first and now the color is nowhere near as clear and bright as the filigree …….. ha fire for you too!

I’m now quite happy with my decision! Yay me!  I just need to attach everything. Rivets! I drill four holes and I just have four nail head rivets left.
oops dropped one, three left. Where on Earth did that rivet go? It was JUST in my hand! sigh Two rivets left. That isn’t going to work. I still had some balled copper rivets I made for my Dia Los Muertos necklace maybe I can make them work. Grabbed them up, flattened the heads and Tadaaa!! Worked great!

Until I realized I missed on the hole placement and the whole thing was too far over. I cut the rivets off except the one that wouldn’t come off the filigree. That one I had to redrill, through the rivet.

Flatten more rivets and finally we’re done! Woohoo! That’s when I remembered I bought a new packet of rivets from B’Sue when I bought the filigree for the hop…… face palm! I had a brand new pack just sitting there waiting for me all along.


This is my finished piece. I’ve never had one fight me so hard as this one has. Apparently the change it up for me wasn’t so much about the cuff as it was with having to continually come up with plan b, c, d, e, f lol 


I may play with it some more, add another rivet on either side and maybe a little embellishment but for now I’m happy with it. Both my son and my daughter like it and my hubs gave me the  "You made this?" seal of approval. And hey! I kinda like it too!

Please join me in thanking our Wonderful Hostess Brenda Sue and visiting the rest of the Hop participants.


List for Blog Hop September 25, 2015
Brenda Sue Lansdowne
Mary Deis
Jann Tague

Lori Beekman

Renee Hong

Cynthia Wainscott

Dana Hickey
Magpie Approved
You Are Here!!

Mary Beth Quigley-Spiker
Karen Eaton

Shari Gardner

Alison Huie

Pamela Anger

Carole Carlson

Cindy Peterson

Marcia Tuzzolino

Charlotte Smothers

Gillian Cunningham Wright

Catherine Shattuck

Clare Wells Nemeth

Erin Whitacre

Lynda O'Mara

Ginger Hammond
Lynn Leigh Designs

Ingrid Anderson
Deb Beechy
Harry Wood
Delyssa Maxwell

Paula Gaskill

Irene Hoffman
Alexandra Sefton
Leslie Carver


Thanks so much for stoppin by!
We'll see ya next time!


Tuesday, July 14, 2015

Left Handed Loop Tutorial

Loops and wrapped loops are something quite a few beginning jewelers struggle with. The headpins purchased at most craft departments are steel and don't bend easily, making them think they are doing something wrong or just aren't very good at jewelers making. A nice loop does take a little practice and armed with a little how to and the proper tools it can be done quite easily.

To get started you will need wire or purchased head pins and a pair of round nose pliers
http://www.firemountaingems.com/itemdetails/h203181tl

or forming pliers
http://www.firemountaingems.com/itemdetails/h203512tl

and a pair of chain nose pliers.
http://www.firemountaingems.com/itemdetails/h204666tl

flush cutter

and optional crimping plier


These days they have a one step looper tool -
http://www.bsueboutiques.com/product-p/looper01622.htm


but it won't make wrapped loops, those you still have to make yourself and I'm going to give you a quick tour of how I go about making them.

To make a simple loop drop a bead onto your head pin and using your thumb bend the wire over the top of the bead in an upside down L. The bead being on the straight portion. Grab the wire between the jaws of the pliers and roll.


Making a loop on a Head pin, WindDancer Studios, free tutorial
Using a head pin.


Continue rolling until it looks like a lollipop.
Trim the excess.

To make a link you'll do the same but loop both ends. Generally when making links I'll slide quite a few beads onto the wire and work from the roll. This saves time and wire.


Wind Dancer Studios, free tutorial, simple loop link
Using round nose pliers to make a simple loop link

Wind Dancer Studios, free tutorial, simple loop link
Using Forming Pliers to make a link.


To make a wrapped loop you'll do pretty much the same thing but you need to leave a space next to the bead for your wraps.

Wind Dancer Studios, free tutorial, wrapped loop link
Making a Wrapped Loop Link


This time we'll place our pliers next to the bead and rock it to the side. The tip of your plier leaves a little space between the bead and the bend.

Wrap the wire around the tips of your plier until you have your lollipop but don't cut the tail.

Grab the tail with your chain nose pliers and wrap it around the space beneath the loop. Wrap as straight across as you can and fill the space.

Trim the excess and tuck the end in close to the wraps with your chain nose pliers.

Sometimes wraps can be a little uneven or the tail just doesn't want to tuck all the way in.  A helpful hint in these cases is to use your crimping pliers and very gently squeeze around the wraps and tail end to even them out and tuck the tail.

Can you spot the wonky links?
Got going too fast on those....now I have to fix them.


The links I found for the pliers had great pictures that showed the pliers tips so you know what you're looking for. I also turned myself into a contortionist so you might have a better view of the plier tips as I worked. There are a full range of product price points and you should purchase what you are comfortable spending as you will get what you pay for when it comes to pliers. I have some really nice very expensive pliers that I absolutely love, I have some mid range pliers that are very nice and fit my hand beautifully and I have regular hardware store pliers that I've owned for many many years, they all do the job I want of them. Treat your toys and tools with respect and they'll last a long time.

I thought you might like also like to see a video of a right hander so you can see the motions. I often use both hands switching back and forth without thought so I thought this might help to see it both ways.


I hope you find this helpful or know of someone who might.

Thanks for stopping by!
We'll see you next time!

Tuesday, February 17, 2015

We Pause for a Moment to Bring You.....

silence.

wind dancer studios, hand woven wire ribbon heart
Year of Jewelry Week 7
For My Love


Seriously, I've been in a work frenzy. Making left and right, working on Year of Jewelry and the Build a Line simultaneously I was going at a pretty good clip. But the mess it was creating on my desk crossed over the line from inspiring to debilitating and it all came to a screeching halt! um I don't like it when that happens, at all.

I cleaned some, and then made some, and then silence.

I have plenty of in progress pieces that don't need much to finish so it shouldn't take long to get the mojo moving again, that's why I work on several at once. It's easy to always have some unfinished to get things moving along again but I sure don't like the silence while waiting.

Speaking of waiting! Blog Hop Two of Three is this weekend! BSue's Build a Line Challenge... we'll be talking about lessons learned along the way, maybe a sneak peek or two of what we've been building ...... I'm looking forward to it! Needless to say next weeks post will be a little early :)

We'll See you this weekend!

Dana

Tuesday, September 30, 2014

Trees and Branches

It seems I've been on something of a tree and branch kick lately. Must be wishing for the cooler temps of Autumn and the colors it brings as I seem to have also been in something of an orange mood too. More of a pinky/coral orange than a pumpkin orange but still an orange.

pearl & coral necklace with copper cherry blossoms
FW Pearls, Peach Coral & Copper Necklace
Instead of a full on Tree of Life this time I opted for a branch of twisted copper cherry blossoms.
This one is something of a convertible, being wearable at different lengths. The vintage style hook closure allows for an 18 inch length when hooked at the first cap, a 22 inch length when hooked at the flower and a 25 inch length when hooked at the end of the extender. I love the soft colors of the coral I got from House of Gems and how sweet it looks combined with the FW pearls I picked up from Fire Mountain Gems recently during their Dutch auction sale. Perfect as we head into fall and will still be awfully sweet when he head into spring.

copper end cone cut lines


I took pics as I made this one thinking I might do something of a tutorial. Then I found this paper plate cookie basket tutorial by One Good Thing by Jillee and darn if it wasn't exactly what I did to make my end "cones" well minus the tape!

One Good Thing by Jillee
*I punched mine out of copper and ran them through the Big Kick to match the cherry blossom focal first.
*I used my flat nosed pliers for spacing and marked the back side with a sharpie so I knew where to cut to. 
*Punched a hole dead center then followed the fold and cut pattern to make the box. 
*Instead of cookies we have crimped bead ends on an eye pin inside a nice neat little open ended copper box that matches the focal, giving it a special one of a kind touch. 

Isn't it fun to think outside of the "box"?! These can be made to any size you need. I love taking techniques I learned from other crafts growing up and applying them to jewelry.  This will even work for a flower petal bead cap if you use a smaller circle or a larger bead. Just be sure to file those edges and corners, they can be a little sharp if you don't.


Thanks for stoppin by!
Feel free to post any "Out of the Box" techniques you use in the comments.
See ya next time!

Wednesday, September 17, 2014

Less Than Wordy

I try to post on Tuesdays. I even have the monthly Birthstone posts to make sure I always have a topic, but sometimes there just are no words to write.

It's not that I'm not feeling creative, I've been busy working away. I just finished up a necklace I'm hoping Stringing Magazine will like. I'm just not feeling terribly wordy.

So...... um.....let's see, something worthy of posting about.... I hosted this month's giveaway in the forum. Or basically in our group on FB. Since about.com changed everything up AGAIN the forum has pretty much been dealt its death blow. Sad, it used to be a hopping place. You could barely keep up with all the posting, now crickets, crickets dropping pins.  Anyway, I used random.org very cool little website I let it pick a number based on the entries and then listed all the entries and had it randomize those and ..... Anne won!  I'll be sending her these little beauties. Pendant made by moi - that little tree of life kick I was telling you about :) A pair of agate hearts, some freshwater pearls, and some moonstone, in grays and peach. Not a huge prize package but enough to get a little inspiration going and I'm sure Anne will make something beautiful with it.


Maybe a kitty post next week or birthstones, who knows?

Thanks for stoppin by!
We'll see ya next time!

Tuesday, July 8, 2014

July's Birthstone = Ruby

Here's hoping those of you in the US enjoyed your long weekend this past week! This month's birthstone is RUBY! My middle child's birthstone, I love red it's an exciting color, her not so much lol Then again Peridot is mine and I rather like Ruby - grass is always greener isn't it? or redder as the case may be.


The glowing Ruby shall adorn,

Those who in July are born;
Then they'll be exempt and free
From love's doubts and anxiety.

Turquoise and Onyx were the recognized birthstones up until 1912 when it became the Ruby.

I did not know that! I just assumed it had always been Ruby. The kiddo might  be on to something there.

I have a Ruby in Zoisite artisan cut cab, but we're waiting for my Muse to whisper it's inspiration to me for its design. Pretty little stone with it's greens and reds.

In the meantime a Ruby Red treasury for you to enjoy.


Ruby Reds on Etsy


Brass FIligree Ring w/ Ruby Red Heart
Brass Filigree Ring w/ Ruby Red Heart
Drops of Red Vintage Button Ring
Drops of Red


Thanks for Stoppin' by!
We'll see ya next time!

Tuesday, June 3, 2014

25 Sketches

25 Sketches: Designs 2, 3, 4, & 5

  Todays post offers up #s 2, 3, 4, & 5 of my series of 25 sketches. Ideas hoarded away and finding their way into the light of day.  IF you were actually looking for my Bead Soup Post it can be found HERE!

Brass Fan Earrings with Cognac Quartz
Brass Lotus/Fans

 Sketches two and three were a no brainer. My muse demanded designs in Boho and that they were. I’ve often said inspiration comes from everywhere. I sew or I did quite a lot when my kids were much smaller. So when they out grew some favorite piece of clothing I would try to find a way to extend its life. Sometimes it meant shirts turned into throw pillows, sometimes it meant pants were turned into shorts and sometimes I didn’t get to something in the mending basket before it was completely outgrown. This was the case with a pink poncho/shawl and an embroidered paisley pant leg - a favorite outfit of my younger daughter.  That long forgotten pant leg was the driving force behind the original sketches, Bead Soup the vehicle my Muse used to bring the idea to fruition. She’s a smart one and at times can be quite persistent, and I’m thankful for it! :)

Brass Paisley Earrings with Peach Pearls & Leather Tassel
Brass Paisley with Pearls and Leather Tassel

 I make what I love, which pretty much means everything in my shop is from my heart. But, as in all things, we evolve. From time to time there may be an item or two in my shop that no longer reflects my current abilities. Loving what I have made, it makes me sad to think I could do better. So I’ll add a small flourish, a twisted ring or two, a back plate, tighten a twist or a wrap,  and sometimes it means taking the piece back to the original idea I had in the first place before I ran in another direction with it! This is the case with the second two sketches I'm sharing today. 

Three Copper Hearts Necklace
Trio of Copper Hearts

 The trio of hearts has been in the shop for some time. While I loved the rustic feel of them - I’ve been leaning more in a romantic boho direction. Classics given a touch of whimsy and added elegance in twists and turns. 
This particular sketch was an idea I was playing with using a key as the focal but as I tightened the twists in the hearts I realized the twining in them was what was really needed for the trio.

Sterling Silver Hoop Earrings
Silver Hoops

The hoops were simply a matter of finally working out that a small jump ring was all I needed to give the ear wire the flex I wanted without sacrificing the arc. A V-8 moment if you will. I have a pair of woven hoops in the shop that may get the same treatment in time as they have the same type of ear wire.

I hope you've enjoyed your peek into a few more of my sketches and design processes. 5 down and 20 to go! 

Thanks for stoppin' by!
We'll see ya next time!

Saturday, May 10, 2014

Bead Soup Blog Party #8 Reveal Beckoning Bohemian

Welcome to Bead Soup Blog Party number 8. The reveal date has finally rolled around and I am excited to show you all that I have made. This is my fourth time participating in the party and I have found it every bit as inspiring as the first, second and third times. This year my partner is Dana James, I wrote a quick blog post introducing her to you here.


She sent these wonderful soup ingredients that just called Bohemian to me, and when I say called I don’t mean whispered. My muse was very clear this was the direction we were taking, and then she went into creative overdrive…………

Together we made armloads of bracelets.

memory wire bracelets/anklets, colorful bangles, copper & leather cuff


I had never played with memory wire, can you believe it? The stuff has been around for nearly as long as I have been playing with beads and I have never even touched the stuff. Not even once. I had in my mind’s eye stackers. armloads of pretty. I started with the teals, inspired by those gorgeous blues in the lampworked beads. Added those sweet sweet floral head pins and Hey, as long as we’re making stackers, let’s play! I grabbed up many feet of aluminum electrical ground wire riveting the ends together and wrapping the resulting o’s with yards of colorful threads and pearls, adding beads and bells for loads of super lightweight, super colorful, super happy bangles. Super right? We were going to town making these fun little things and it dawned on me, I hadn’t touched a single soup bead since bracelet number one - gasp! Never fear my dear, these are meant for stacking together!!
Returning to the memory wire this time I worked in earth tones picking up the subtler colors in those gorgeous lamp worked beads.

Ready to get in some metal work I made up some textured copper strips and wrapped up some leather fully intending to use one of the clasps Dana had sent. But when I was ready for it, the clasp just didn’t seem to work, sigh. Not one to argue with my muse I finished the clasp using a piece of the leftover copper and textured it so that it matched beautifully. 

I remembered I had this great little bracelet wire from the Bead n Button design challenge that I hadn’t gotten around to using and what better way to showcase one of those lamps than that? I added a stamped filigree, a little flower with crystal center, and a Czech picasso leaf. Just sweet!


Then I made some connectors and played with those cool little copper bars and beads Dana sent. They looked really good with the larger lampworked beads and bracelet number 14 was born. This time I did use one of the clasps Dana sent :)

I had sketched up a design for the focal and ordered the bits I needed from B’Sues. I finished out the detailing while waiting in the lobby at the Drs office while the hubs was getting his eyes dilated. I had planned on etching the mehndi style designs but all I managed to do was discolor the metal ;/ hmmm


While I contemplated discolored metal I formed and forged some frames then wrapped up a couple pair of earrings. I LOVE these earrings. The first pair have Cognac hydro quartz and matching crystals from the soup stash and the second feature those sweet peach pearls Dana sent.

Brass choker - lace & flowers in brass and copper


Back to work on the focal I decided I would engrave it instead. Using a dremel and very slow speeds I did something I thought I could not do, I engraved a straight line. Seriously, I once answered a question about engraving with a no you can’t use a dremel, you need special tools……. ahem I stand corrected. ( I think I might really want those special tools now though - engraving is kinda fun!! )

So I engraved not just front but back. Riveted vintage opals and wired the brass lace into place. I added hand made flowers again with crystal centers and a short length of crystal beaded chain.

At this point I thought I was done. I had very little soup left, bullet casings, crystal points, a clasp, pearls and crystals. I so wanted to make one of those cool bullet casing points but the points are 1 mm too big ONE. The hubs says you just need to stretch the casing. LOL That’s all….. the muse leans over and says I have an idea…..

brass and copper dragon entwined around a quartz crystal point


….. and a dragon was born. The focal piece was my favorite up until this point. Pun not intended! I wrapped the point in a strip of engraved brass, followed by a woven strip reaching up behind into wings. At least it did. I didn’t like the way the one wing was sitting. I thought it was too low. I’m using brass, brass is a fairly hard metal and is brittle when work hardened. I gave a slight bend to the wire, and snap! off came the wing. I had to take the whole thing apart and rework the game plan. This is one of those times when uh oh is truly to your advantage. I made a second pair of wings and sawed a new head added vining swirls to the end of the bale to make the back as interesting as the front and wow! Even my son loves this guy. And look….. the second clasp found its way in too!

At the time of this writing I still have several days until reveal……… I wouldn’t be surprised if another little something found its way into this post as my muse doesn’t think we’re quite finished yet :D

As I was saying with the delay I had several extra days to play! And play I did, I finished up two UFO's you can see that post here (fortunate I did too, as I needed a blog post lol)  AND look at that! Two more pair of earrings found their way into the blog party!

forged and wrapped brass hoops, woven and scrolled brass copper and smokey quartz dangles

First pair is a simple forged pair of brass hoops wrapped with a peach pearl and the second woven and vined brass and copper with smokey quartz and crystal.

I still have quite a few ideas swimming, seriously inspiring this round, BUT it's only a few hours away until reveal. Yesterday was the hubs birthday and Mother's Day is this weekend. I think I'll play with my muse again in a couple days, right now I think I'll spend some quality time with my family and start hopping bright and early - or after I've had a couple sips of coffee  and can form coherent sentences!  :)

We have close to 500 participants again this year… wow! Make sure to visit Dana’s blog  to see what she made with the goodies I sent her (that’s where I’m headed first!! ) then head back to Lori’s blog Pretty Things    to catch the rest of the hop!

And if you'd like to peek at my past soups you can always visit these pages

Bead Soup 5
Bead Soup 6 
Bead Soup 7


Thanks for stoppin by!

We’ll see ya next time!