Showing posts with label Christmas. Show all posts

Tuesday, December 15, 2015

Hand Crafted Holidays: of Rolling Pins and Pastry Cloths

The Hand Crafted Kitchen
Week 5 Rolling Pins and Pastry Cloths

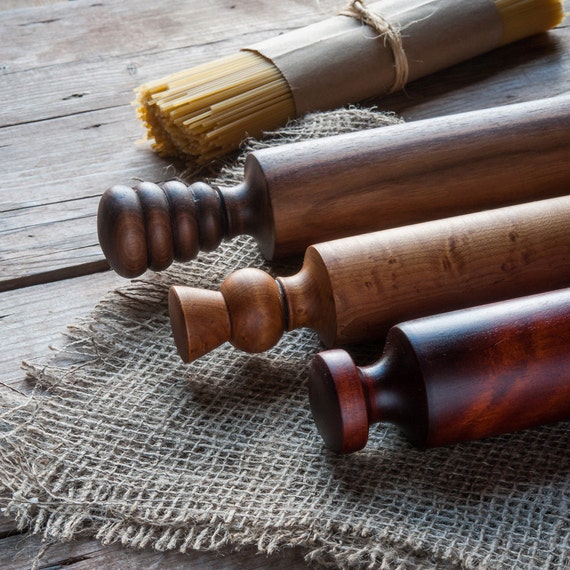
I’ll be the first to admit my rolling pin is just a basic wooden spinner with handles. Until I started looking at the hand turned pins I really had no idea how many styles there were. To top it off the kiddo and I have been watching The Great British Baking Show on Netflix and the variety of pins they use is kind of amazing to someone who’s only ever used a spinner.


Just look at how many styles Cattail Woodworks has. I LOVE this store on
Etsy. Do yourself a favor and visit, just gorgeous functional artwork!


This mornings e-mail  from King Arthur Flour had Springerle molds and rolling pins. Springerle is a type of German biscuit with an embossed design made by pressing a mold onto rolled dough. The key to using them is allowing the impression to dry a little before baking, as that preserves the detail of the pattern. Etsy has had several rolling pins with gorgeous designs that have been featured in the newsletters recently.

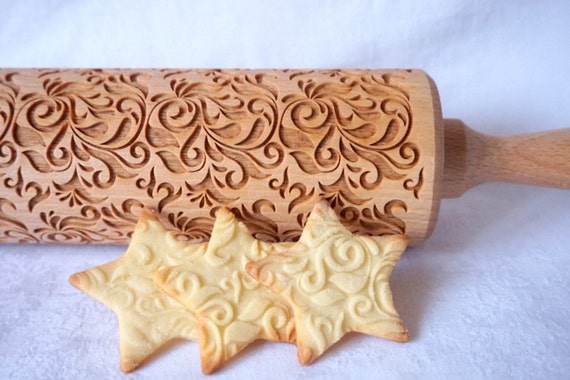
Housemate Artist on Etsy
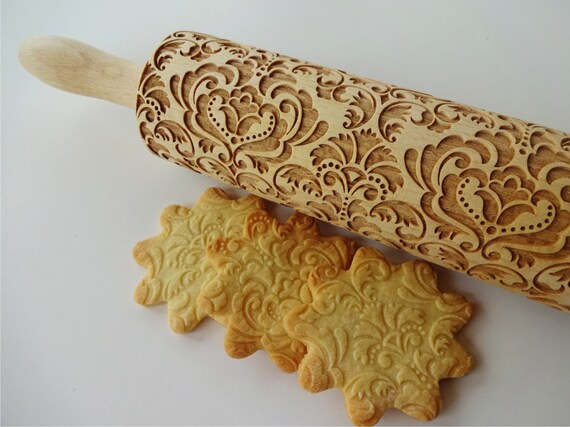
AlgisCrafts on Etsy
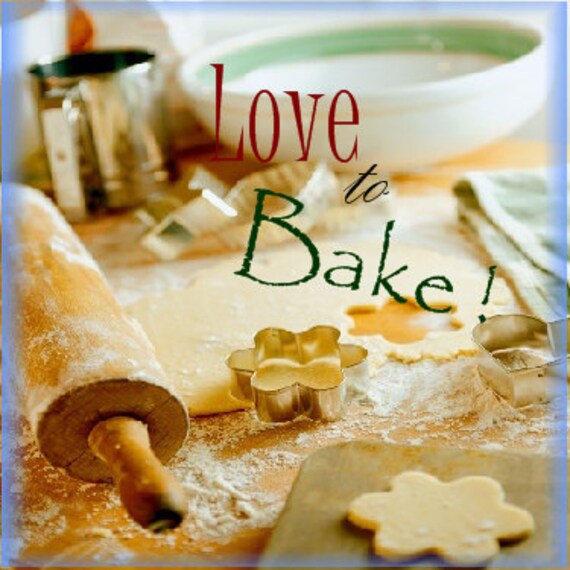
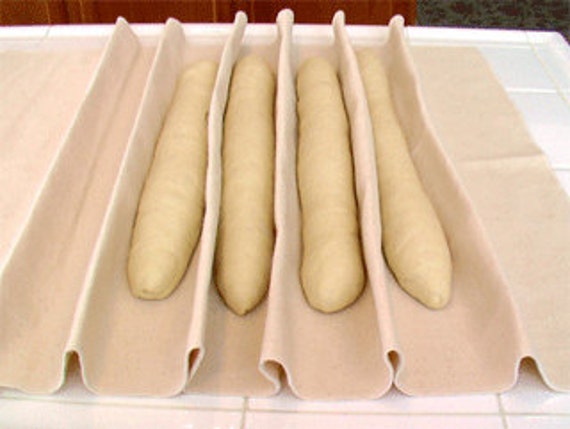
Another thing we watched them use on the show was a pastry cloth. Now, I’ve used a cloth to cover my dough while rising but I had no idea how many uses those have as well. I’ve found a few for you and the instructions to make your own if you’re so inclined. I kind of think I might need a real one now. In fact I think I’m going to go rummage through that box of antique and vintage linens to see if I don’t already have one. I sure know where to find one, if there isn’t!

FarmGirlCreations on Etsy
QuiverTreeBaking on Etsy

Why YOU Want one Too! and the Instructions on how to
make your own on Make it & Love it


This weeks blog post was an educational one for me, I love when that happens! Since I do enjoy baking a thing or two that’s a double bonus.

The holidays are about sharing and caring, and I’d like very much to get the word out that hand made is heart made as is the holiday season. 
SO, If you like this post, and I hope you do! Please feel free to share it! Blog about it, Tweet it, Pin it, Instagram it and give it a shout out on FaceBook. Don’t forget to come back each week for another post in this years series: The Hand Crafted Kitchen

Thanks for stoppin by!
We’ll see ya next week!


Tuesday, December 8, 2015

Hand Crafted Holidays 2015 : Week 4 Mixing Bowls


The Hand Crafted Kitchen

As you know, my daughter is a ceramicist and she has made several bowls for me that I use in the kitchen on a regular basis. There is nothing quite like a hand thrown bowl to mix in, you just know anything made in a hand thrown bowl is made with love. 

A hand thrown mixing bowl is just heavy enough to bring back all sorts of memories of helping Grandma in the kitchen, whether taste testing, measuring ingredients, or as head stirrer of the bowl. That solid bowl is a keeper of some of our best memories.

So I have poked around Etsy and Amazon to bring you just a few of my favorites today.

MagPie Approved: HandMade Holiday; Mixing Bowls
Leslie Freeman Designs on Etsy
Magpie Approved- Handmade Kitchen - Mixing Bowls
Gentlemanly Pursuits on Etsy
Magpie Approved- Handmade Kitchen - Mixing Bowls
Jan Fairhurst Pottery on Etsy


MagPie Approved- Handmade Kitchen - Mixing Bowls
Paige Hickey Pottery on Amazon


I hope you make many new happy memories with them as well.


The holidays are about sharing and caring, and I’d like very much to get the word out that hand made is heart made as is the holiday season. 
SO, If you like this post, and I hope you do! Please feel free to share it! Blog about it, Tweet it, Pin it, Instagram it and give it a shout out on FaceBook. Don’t forget to come back each week for another post in this years series: The Hand Crafted Kitchen

Thanks for stoppin by!
We’ll see ya next week!

Tuesday, November 24, 2015

The Hand Crafted Kitchen: Week 2 Aprons

The countdown to the holidays has begun! Thanksgiving is this week and Christmas follows (as usual lol) just four weeks behind.

This year I’m focusing the series in the kitchen. What says kitchen more than the Apron?
It doesn’t matter if the kitchen is indoors or out, an apron means business!

MagPie Approved: My Grandma's Hand Embroidered Apron
Hand Embroidered, My Grandmas Apron


I received a most wonderful gift from my Aunt (Dad’s sister) recently. She sent some wonderful old family photos of my grandparents, aunts and uncles and some of the grandkids (my cousins, me included) But she also included my Grandmas apron. Pristinely white with hand embroidered flowers. Tucked in with the apron were hand tatted lace edged hankies and pillow cases my Grandma had made. Lace making amazes me, it isn’t something I ever picked up. Makes me wish I had.  

Once upon a time all of our kitchens were hand made!

As much as I LOVE my Grandmas apron I would be heart broken if I stained it or tore it somehow. Off to Pinterest to find the apron patterns! I am forever dropping beads and jump rings in my studio. That means umpteen hours on my knees with a flashlight hunting down the little um buggers under the armoire and dressers i use for storage. An apron might could catch those runaway items before they could ever hit the floor!

My kiddo as you know is a potter, she needs one that covers front and back - muddy hands!

I have two patterns tucked away on my boards that fit our needs beautifully.
They can be found here: on my  Pinterest Board


If you don’t sew or just don’t have the time this year, I took a few minutes to poke around and found some wonderful Handmade Aprons available for purchase.


Etsy

MagPie Approved: HandMade Holiday Week 2 Aprons
Bonnies Sew Crazy on Etsy


MagPie Approved: HandMade Holidays  Aprons
Misses Country on Etsy
MagPie Approved: HandMade Holiday Week 2 Aprons
Linen Sky on Etsy


and on Handmade @ Amazon 


MagPie Approved: HandMade Holidays  Aprons
Victoria Eggs on HandMade @Amazon
MagPie Approved: HandMade Holidays  Aprons
HardMill on Handmade @Amazon


Oh my I LOVE this apron, perfect for my studio! It’s a bit out of my budget for right now, so I’ll have to save my pennies and wait on it a little bit. 

In the meantime I’m pulling out the sewing machine…….just as soon as I find some suitable material. I haven’t quite decided, duck cloth or ticking or just a heavy cotton…… decisions decisions!

The holidays are about sharing and caring, and I’d like very much to get the word out that hand made is heart made as is the holiday season. 
SO, If you like this post, and I hope you do! Please feel free to share it! Blog about it, Tweet it, Pin it, Instagram it and give it a shout out on FaceBook. Don’t forget to come back each week for another post in this years series: The Hand Crafted Kitchen

Thanks for stoppin by!
We’ll see ya next week!


Tuesday, November 10, 2015

Hand Crafted Holidays 2015 : The Hand Crafted Kitchen

MagPie Approved: Wind Dancer Studios, Woven Ribbon Heart
A Little bit of a Woven Ribbon Heart

If home is where the heart is, the kitchen is the heart of the home, and hand crafted is heart crafted, it just makes sense that this years Hand Crafted Holiday series be a Hand Crafted Kitchen.

The countdown to the holidays has begun! Thanksgiving is in just three short weeks and Christmas follows (as usual lol) just four weeks behind.

This year I’m starting the series off with Hand Crafted Vanilla Extract. It may seem a bit early but  vanilla extract takes several weeks to make and I wanted to give you ample time should you choose to make it yourself.


If like me you love the smell and taste of real vanilla extract, you can imagine just how deliciously good a made with love batch tastes. We have a family member who makes it every year and mmmmm it’s good!

In the spirit of the holiday season I thought I’d share that home made goodness with you. 
I’ve found recipes and kits, bottling supplies, labels and ways to decorate your bottles so that they’re as unique as you are! And I’ve also found a wonderful new shop on Etsy that sells A Beautifully packaged extract that has been aged for an entire year. 


I found a recipe at Tidy Mom that looked super simple to follow: http://tidymom.net/2012/recipe-for-vanilla/

and another here: http://theimprovkitchen.blogspot.com/2011/12/worth-extra-step.html  and this one also includes Vanilla Sugar, imagine that on some Cinnamon toast, or Cinnamon Rolls! mmmhmmm 

I just got this e-mail from King Arthur Flour with a kit so you don't have to hunt down vanilla beans:


and another kit on Etsy https://www.etsy.com/listing/254560165/

If you prefer to use the recipes above and source the beans yourself, I've found some fun bottles for your finished product:

MagPie Approved: Pinterest find Apothecary Jar Supplies
Apothecary Jars
Available HERE

MagPie Approved: Etsy find Apothecary Jar Supplies
Brown Glass Jars
on Etsy


You could use the really pretty labels provided with the recipe above but I also found some really Great DIY labels over at http://www.thebudgetdecorator.com/diy-label-projects-and-free-printables/   you might like to try.

MagPie Approved: Pinterst find  DIY  Labels
DIY Labels found on
Budget Decorator
MagPie Approved: Pinterst find  DIY  Labels
DIY Labels found on
Budget Decorator


I poked around on Pinterest some more and found some great tutorials on decorating those bottles:

Step by Step Photo Tutorial
found on this BLOG

Bottles Etched Using Martha Stewart Doily Stencils


If after all of this, you'd prefer to purchase your Artisan Vanilla rather than make it I found a cute little shop on Etsy with some wonderfully packaged Vanilla.


Wind Dancer Studios: Etsy Find Artisan Vanilla
Artisan Vanilla Found on Etsy
HERE

LOVE this vintage Vanilla signage found on Etsy
HERE
While I don't have any extract in my shop I do have some Smokey Quartz 
= Jewelry with gorgeous rich and smooth vanilla extract coloring =

MagPie Approved: Wind Dancer Studios Smokey Quartz Earrings
Found in my Etsy
HERE
MagPie Approved: Wind Dancer Studios, Smokey Quartz Earrings
Found in my Etsy
HERE


https://img1.etsystatic.com/039/0/5717654/il_570xN.625303869_guig.jpg
Found in my Etsy
HERE

The holidays are about sharing and caring, and I’d like very much to get the word out that hand made is heart made as is the holiday season. 

SO, If you like this post, and I hope you do! Please feel free to share it! Blog about it, Tweet it, Pin it, Instagram it and give it a shout out on FaceBook. Don’t forget to come back each week for another post in this years series: The Hand Crafted Kitchen


Thanks for stoppin by!
We'll See ya Next Week!

Wednesday, December 10, 2014

In the Oven and What I'm working on ...


With the swap items finished up I can turn my attention to the color challenge proffered by Dry Gulch and the Art Jewelry Elements Snowflake ( I won one from Diana @ Suburban Girl Studios!!) I have ideas, oh have I ideas! annnddd..... I got a box of goodies fro Rio Grande. Silver prices dipped and I took advantage of it while I could. Yup I am going to try my hand at bezeling and flush setting itty bitty czs, yes I am I am. If you could see the grin on my face. This is the best end to the year/beginning, I'm a happy camper.

So since my nose is to the grindstone so to speak for the next couple weeks and and festivities Merry Merry to you and yours! I though I had better get a cookie recipe up here for you!

Peanut Butter Blossoms from Hersheys.com
Yum!

These are MY all time favorites they never hang around my house very long.

Peanut Butter Blossoms


Ingredients 
  • 48 HERSHEY'S KISSES Brand Milk Chocolates
  • 1/2 cup shortening or butter (shortening keeps them fluffy but butter tastes better)
  • 3/4 cup  Peanut Butter
  • 1/3 cup granulated sugar
  • 1/3 cup packed light brown sugar
  • 1 egg
  • 2 tablespoons milk
  • 1 teaspoon vanilla extract
  • 1-1/2 cups all-purpose flour
  • 1 teaspoon baking soda
  • 1/2 teaspoon salt
  • A couple Tbs of granulated sugar for rolling the balls in

Directions

1. Heat oven to 375°F. 
2. Beat shortening and peanut butter in large bowl until well blended. Add 1/3 cup granulated sugar and brown sugar; beat until fluffy. Add egg, milk and vanilla; beat well. Stir together flour, baking soda and salt; gradually beat into peanut butter mixture. 
3. Shape dough into 1-inch balls. Roll in granulated sugar; place on ungreased cookie sheet. 
4. Bake 8 to 10 minutes or until lightly browned. (my oven likes the 8 minute mark)
5. While cookies are baking remove wrappers from kisses. 
6. With about a minute or two to go press kisses into the center of cookies and return to oven; cookie will crack around edges. 
7. When done remove from cookie sheet to wire rack. Cool completely. Makes about 48 cookies of yummy goodness.

We're thinking of making some sugar cookies this year so maybe we'll post the recipe next week.
Thanks for stoppin by!
Merry Merry!
Dana


Wednesday, January 8, 2014

Garnets and Orchids


I had in mind for this blog post something along the lines of resolutions for the coming year, you know try some new moves, try some new foods, drink more tea, shop more Etsy. But I already told you how I planned to use my sketches so a resolution post seems kind of redundant.

I don’t have anything On the Desk at the moment as I’ve been cleaning up the studio/office while I wait for my cabinets to get painted. Alex promised to paint a pair of cabinets we have sitting in the basement for me as part of my Christmas present! I saw a pin on Pinterest awhile back that had this wonderful work area of cabinetry and shelving and I’m going to put together a similar system using what I have - 2 x 12’s and cinder blocks for shelving plus the cabinets. The hubs doesn’t like my idea, I say he can fine tune later, I need something NOW.

For Christmas, I bought my hubs some tools he had been wanting but for some reason or other wouldn’t buy, which seemed to give him the to ok to buy some more tools he needed but never bought. As a result, I’m finally getting my pantry!! YEA!! I am sooo looking forward to that!

So have I done ANYTHING at all jewelry related? Sure I have. I’ve created a new banner for my FB page and rebel mouse. And I’ve been playing with color in a couple treasuries.

Pantone’s color of the year is Radiant Orchid, so I pulled together a few shades of orchid.


and January’s birthstone is Garnet. So I pulled together a treasury filled with Garnet reds.


I really enjoyed the birthstone treasury and am considering making it a regular thing - I could play on that theme a little on FB too. I do need to utilize the page a little differently than I have been. With all the changes being made, I’m down to a handful of views per post. I’m hearing crickets, and if that’s the new norm then the least I can do is try to orchestrate them and turn them into a symphony. Ok no more punnys, I just couldn’t resist {grins}


It’s sleeting again, so I’d better get out there and feed the horse before it gets icy. I’ve only just gotten healed up from the fall I took last ice storm. sigh…..
Since it seems appropriate here, I'll leave you with a couple Garnet pieces from my shop.

Thanks for stoppin’ by! Stay warm out there!!
See ya!

Tuesday, December 31, 2013

Happy New Year!

Happy New Year!

The year has wound down and only a few hours remain until the New Year begins. As such, I have begun the required organizational clean up in my studio/office and thought I might share with you a few Christmas gifts from this year.

I made ornaments again this year. I like making them, they're quick and easy and allow me to get as ornate as I’m in the mood for. This year I added a little metal work to the mix by making the larger bead caps I used. Some just by dapping and shaping, and others I punched, shaped and LOS’d.


Some for my forum friends and our annual swap


and some for my family.

I’m blessed with a hubs and children who give truly thoughtful gifts, so of course I got some great gifts again this year. This one though, is my favorite! It’s been a running joke between the hubs and me for a good number of years now. He likes his coffee black and I like mine not so black, so it was an absolutely perfect gift and was immediately hung in the kitchen above the coffee pot.


Here’s hoping the New Year brings you Health and Prosperity and a great deal of Happiness!

Thanks for stopping by!
See you next time!

Tuesday, December 10, 2013

on ReMaking my Christmas Wreath

I missed last weeks blog post I know but I do hope you’ve been enjoying the hand made Christmas finds I’ve been posting on the Rebel Mouse side of things here on the blog!

First things first - I’m getting much better at stacking rings!! Woohooo me! I’m now wearing 4, three stacked and one knuckle ring. I am so excited it won’t be long, I’m sure, before I feel they’re good enough to offer them to you in the shop.

My swap items were sent out the door later than usual :/ and Christmas seems to be descending upon us at an amazingly fast rate this year. You feel it too? So I thought it might be fun to snap a few pics as I reworked my wreath this year.

I had made a wreath several years ago and it was hung proudly on the front porch every year. Then we had an unexpected storm that beat the heck out of it, breaking it into several pieces. Tucked away in the storm cellar, it waited until I had the urge to rework it. A couple weeks ago, I saw a wagon wheel wreath posted by Two Women & a Hoe that I loved. Those of you who have been following the blog know I live in a log home and a slightly rustic/slightly victorian decor is the way I have been leaning. As such I just happened to have a repro wagon wheel I had planned on using to rustic up a chandelier and decided this was a much better idea for it :) I’ll use the pretty chandelier up here instead, the hubs likes it better anyway so that should make him happy and the bronzed chandelier can go downstairs minus the wagon wheel.

So here we go: this is the inspiration wreath:


I have got to learn how to resize these smaller!

and this is a quickie step by step on how I made mine.

You will need:
a wagon wheel (repro is fine, mine is)
a pine bough garland
a holly leaves garland
red velvet ribbon
burlap ribbon
floral pick of rose hips or other red berries
Scissors

Gather all your materials and keep them in an easy to reach spot or have a helper at the ready. Paige helped and took photos too!


Step 1 Photo 1
Begin by wrapping the pine bough garland around the wagon wheel.

Step 2 Photo 2
Find the center of your holly garland and the center of your wrapped portion of the wheel. Bring the two centers together and begin wrapping the holly garland around the wheel. First one side, then the other. This keeps the garland on the wheel balanced should one length of garland be longer than the other.

Step 3 Photo 3
Cut a length of burlap and make a bow for your wreath. Cut another smaller piece to tie the bow to the wreath, but don’t tie it yet.
Find the center of your red velvet ribbon and make a couple loops slightly larger than your burlap bow.
Place the burlap bow in the center of the loops and tie the smaller piece of burlap around the two bows.
Tuck the berry pick into the bows knot at the back.
Tie the bow onto the wreath. I usually like mine just off center.

Step 4 Photo 4
Take the red velvet tails and weave them in and out of the garland, allowing it to twist and curl as you like.
Cut a piece of burlap about the same length as your velvet ribbon and tuck it behind the bow and into the garland at pleasing intervals.
Spread the loops of the red bow to fan them out a bit. Bend and twist the berry pick so that it sprays out and you’re happy with how it looks. That’s it, you’re done! Hang it out or lean it up against the wall, add a basket or some pinecones and you’re good to go.

I hope this inspires you to make your own wreath. It's incredibly easy and the results are fun! The wreath I replaced used a styrofoam form as a base. I used pretty much the same techniques on it as this one but covered the entire form.

Thanks for stopping by!
We'll see ya next time!

Tuesday, November 12, 2013

The Here and Now…. or Looking Back and Planning Forward

The end of the year is fast approaching. I’ve been assessing my goals and where I stand, I’ve met or have nearly met most of them - yay me! So it’s time to create a new plan for the new year, building on where I am now and in keeping with where I want to go.

Idea hoarding 1

During the Bead Hoarders Blog Hop, Perri mentioned idea hoarding, and I had to admit I had been hoarding quite a few ideas. Mine mine mine, my precious….. all mine! Maybe not quite that bad, but it was getting there. So first things first! I’m going to sift through my sketches and pull 25 of them into the light. Originally I thought 52, a sort of on the fly homage to YOJ but, I do like to participate in a hop or two and that might tend to over load my plate. 25 on the other hand gives me plenty to work with and leaves me time to play, learn new techniques, and participate in hops, so that’s my number and I’m sticking with it!

I’ve noticed I have not been as active with Wind Dancers FB page as I would like to be or even as much as I used to be. As an added bonus the 25 sketches gives me a way to engage, to show my processes and start sharing again. I’ve also been looking into Rebel Mouse, if what I’m reading is right, it can act as the front page for the blog here and feed into FB the way this blog used to. What’s cool is it gives me back the ability to share the pins I find that are relevant to my blog posts. I really really liked that and I miss being able to share them. Annnnd it turns all that I spend way too much time on (place your fav soc. media site here) into actual productive time again. That kind of jazzes me, must be the Virgo coming out! Organization AND Productivity WHOOT!

Expect to see (hopefully) some finished UFO’s over the next few weeks I have a couple I’d like to get finished up by years end (knocks on wood!) and of course the home made Christmas features, only SIX weeks left!! Yikes, I haven't even decided yet what I’ll be making for gifts this year! ….. sigh I feel so behind …. Then we can get started on the new years postings!

Thanks so much for stopping by!
We’ll see you next time!