Showing posts with label jewelry. Show all posts

Tuesday, April 26, 2016

Of Poetry, Ideas, and Talismans

Poem 2 

He’d finally found his freedom
but he wasn’t really free
He watched her walk away
and said it was meant to be
The years had slowly passed
but his heart, it grew heavy
knowing how he’d wounded
his true love, his one and only.
He’d plunged the dagger in her chest
twisting it so slowly.
He knew the pain he had caused
still, he blamed her for it solely.
~~ Dana  2016

I’m thinking this is turning into an epic rather than sister poems, I feel there’s still a bit more of the story to write. Or maybe an entire collection, who knows. Definitely been a good outlet for me lately though. The inspiration could evolve into a series of dagger jewelry or hearts, oh or both. hmmm may have to play with this idea a bit more. We’ll see how it  evolves.

This weeks Year of Jewelry piece is a talisman for myself A simple stack of gemstones from top to bottom Moonstone, Rose Quartz, Garnet and Labradorite. There are a number of books and websites that list the mystic and or healing qualities of the various gemstones. I used to have several of those book marked but a couple crashes and a couple computers later I’ve lost more bookmarked sites than I can remember. So when Pearl over at the Beading Gem posted this particular website   I thought I’d  take advantage  while I  was thinking of it and chose my stones for my talisman.

talisman |ˈtaləsmənˈtalizmən|
noun (pl. talismans)
an object, typically an inscribed ring or stone, that is thought to have magic powers and to bring good luck.


Wind Dancer Studios: A Talisman for Me


If you remember my goals and aspirations for the year you already understand my choices. Strengthening those good things in my life. and making a pretty little something for myself at the same time :)

Moonstone- Divine, Harmony And Feminine
Moonstone is an excellent stone to use in meditation to understand oneself. Moonstone supports the heart as it stimulates the mind, soothing worry or anxiety, and bringing out the best in people. Its loving energy promotes the Divine in all situations. It helps to strengthen intuition brings balance and harmony. It soothes stress, anxiety, women's hormones it enhances intuitive sensitivity via feelings and less overwhelmed by personal feelings. Greater flexibility and flow with life It reminds us of our own worth and divinity. It invokes sensuality and gentle passion. It enhances and makes aware the power of the Divine feminine.

Quartz- Amplification, Clearing, Cleansing, Healing, Power, Energy
Clear Quartz stones are one of the most versatile stones in the mineral realm. It easily enhances any intention focused through it. It also amplifies the energetic properties of any stones it is used with. Different formations of quartz have other associated properties: Ancient Japanese believed quartz formed from the breath of a white dragon, and regarded it as representing perfection. Quartz is a power stone. It has been called the "Universal Crystal" because of its many uses. It enhances energy by absorbing, storing, amplifying, balancing, focusing and transmitting. It channels universal energy. Quartz also enhances thoughts, as they are a form of energy. Because it directs and amplifies energy, it is extremely beneficial for manifesting, healing, meditation and protection.. Due to its ability to balance, quartz is excellent for harmonizing and balancing one's environment. Quartz is also good for energizing other crystals. Quartz is also a stone of clarity, which dispels negativity and clears away negative energy. It can be used to purify and clarify on the spiritual, mental, and physical planes. It is powerfully protective because of these properties. Quartz enhances spiritual growth, spirituality and wisdom. Because it clarifies thought processes and emotions, it can increase inspiration and creativity. It can also help particularly with concentration, studying, and retaining what one learns. Quartz is also a stone of harmony because it balances energies, and is even helpful in romantic relationships.
Rose Quartz -Unconditional Love, Friendship and Self- Worth
Rose quartz is a beautiful translucent pink stone that radiates the energy of unconditional love. It is the best crystal for healing anxiety because it replaces worries and fears and brings in feelings of calmness and reassurance. Rose quartz is often called the "Love Stone." Its energetic hallmark is that of unconditional love that opens the heart chakra. This makes rose quartz a stone for every type of love: self-love, family, platonic, romantic, and unconditional. As a variety of quartz, rose quartz has high energy, and this strong energy can enhance love in virtually any situation. Rose quartz is used to raise self-esteem and a strong sense of self-worth. Its loving energies teach us to apply this love to ourselves and thereby find ourselves more worthy. Emotionally, rose quartz is used to balance emotions and bring peace and calm. This calm emotional balance brings stress relief and easing of anxiety.  All these things carry energies of forgiveness, tolerance, and compassion to the fore, enabling us to see the good in both others and ourselves.     

Garnet- “Stone Of Health And Passionate Devotion” - Love, Emotional Harmony, Vitality And Passion
The stone of passionate devotion: to your family, your friends, yourself, and your own purpose in life. Attracts profound love, gives persistence, cures depression. The Garnet is a stone of purity and truth as well as a symbol of love and compassion.
Garnet is a powerful energizing and regenerative stone. It balances, strengthens and protects. Garnet sharpens your perceptions of yourself and other people. It dissolves ingrained behavior patterns that are no longer serving you, and helps you let go of obsolete ideas. Garnet removes inhibitions and taboos, opening up the heart and bestowing self-confidence. It revitalizes feelings and enhances sexuality, bringing warmth, devotion, understanding, trust, sincerity and honesty to a relationship.  Red Garnet controls anger, especially toward the self.

Labradorite-  “Bringer Of Light”, Protective And Positive
Labradorite is the most powerful protector of the mineral kingdom, creating a shielding force throughout the aura and strengthening natural energies from within. According to an Eskimo legend, the Northern Lights were once imprisoned in the rocks along the coast of Labrador. It is told that a wandering Eskimo warrior found them and was able to free most of the lights with a mighty blow of his spear. Some of the lights were still trapped within the stone, and thus we have today the beautiful mineral known as labradorite.  Labradorite is said to provide quick relief from anxiety, hopelessness and depression, replacing them with enthusiasm, self-confidence and inspiration. It is said to dispel negativity and to bring clear understanding by enhancing clarity of thought and improving one's ability to cooperate with others in harmony. Labradorite stimulates intuition, especially the art of “right-timing”. 

What stones would you use if you could choose in a talisman for yourself? Let me know in the comments


Thanks for stopping by!!

Tuesday, April 19, 2016

of Torches and Rings

Thank goodness for the Year of Jewelry project. I’m feeling less than chatty and like I have no words again this week so it’s Year of Jewelry to the rescue.

Magpie Approved: OUCH
Thank goodness for Lavender Oil

If you follow me on Instagram you saw the burn on my thumb. I was a little careless and lost in thought rather than paying attention to the location of my hand. Ouch. A little lavender oil and my thumb healed up beautifully. 

Since then I’ve noticed my torches flame is flowering. My awesome son cleaned the tip for me but that didn’t completely solve the problem. I switched over to using my butane torch but it has always been hit or miss. (I think it was a bit of a lemon) My son being the wonderful kid he is, went out and bought me a new tip. My husband being the loving man he is, went out and bought me a new butane torch. I was one Happy Camper!

Wind Dancer Studios: Sterling Silver Band

So this weeks post brings to you a simple band of sterling silver. Lightly textured and soldered with the new torch.  And the Kiddo claimed it immediately as payment for the modeling session!! Ha!  I need to steal it back for a few photos to create a made to order listing. She wears it stacked with another ring she purchased and they look beautiful together.


Sterling and Ruby in Fuchsite


I also shared on Instagram a pendant I had made a few weeks back. I dropped it and the cab/bezel popped off. The new small torch went in and tacked it right back in place!! This one has a good solid pin point flame the other one never had. The hubs did really really well!

That's about it for the week!
Thanks for stoppin by!
We'll see ya next week!

Tuesday, April 12, 2016

Bell Flower Earrings

Week 15 of Year of Jewelry is a sweet pair of earrings. Bell flowers made form little brass bells.

Wind Dancer Studios; Bell Flower Earrings


Once upon a time I used to get daily e-mails for the Beading Gem. I’m not entirely sure why I don’t anymore upgraded servers on her end or mine, I dunno. I don’t seem to get a lot of mail that I used to…. Anyway one of the last e-mails I remember was for a tutorial for some really sweet earrings. The original poster had tried to use bells but didn’t quite like how they turned out so she had dissected the bells to create her own. I actually liked how the bells looked so I stuck to that part of the tutorial in making my own. I may try the rest of it some day in the future but for now I’m happy with these.


Thanks for stopping by!

We’ll see you next time~

Tuesday, February 16, 2016

A Quick Tutorial on Adding Patina to a Copper Ball Chain

I love the warmth of raw copper, it’s very similar to Rose Gold probably because Rose Gold picks up it’s rosiness from Copper :) and with todays  Gold prices copper is VERY affordable. Put a little patina on it and it takes on a calm earthy feel, put a lot of color on it and it takes on the appearance of a relic.  

Today’s blog post shows you how I added a little depth to the copper ball chain I used in last weeks Year of Jewelry post “Charmed I’m Sure”


1: Liver of Sulphur works best if warmed first so I always start by warming some water in the microwave.
2: The metal will take the color faster if it’s clean and warm too so before I add the LOS I drop the chain in the hot water while getting everything ready.


3: Pull the chain out of the water and add a drop or two of the LOS gel.


4: Give it a quick mix and drop your chain back in the LOS mixture. 
It won’t take long at all for the color to appear. 


5: Pull it out to check the color and dunk a time or two, or until you’re happy with it.


6: Rinse it off and buff back the high spots with a little steel wool - I’m using an SOS pad, but you can also use ScotchBrite or 3M products.
If you take it too far back, give it another dunk or two and and start again. Sometimes the color comes up first try and sometimes it takes a couple rounds until you’ve got the depth you’re looking for. 


That’s all there is to it, it’s really very simple. You can play with it some and get a rainbow of colors. I’ve found if you heat your metal and make a weak solution the colors are easier to manage, make sure you seal them once you’re happy though as the patina will continue to darken naturally otherwise.


Week 7 of Year of Jewelry: 


Still on a feather kick with a simple wrap bracelet this week. Turquoise from my favorite purveyor of turquoise MagPie Gemstones, more from my BFF  Moonie, and Coral from House of Gems. Silver hearts and feathers are repurposed from an estate sale find and are most likely plated or “toned”,  vintage seeds (I can verify their age as I bought them new lol) as well as new. A sweet look for an easy on easy off wrap.

Thanks for stopping by!
Dana


Tuesday, February 9, 2016

On Revisiting a Charmed Piece

Wind Dancer Studios: On Remaking a Charmed Piece: Before
Before: Charmed I'm Sure
Apologies, slightly under exposed here.....

Week 6 Already! Wow time is speeding right along! This week’s “A charm”  You might recognize the charms on the necklace. I made them for my loop tutorial found HERE. As you can see, I had put them on a leather cord but I was never quite happy with that. It just seemed too heavy for the dainty charms so I just set it aside.

I realized I had some ball chain hidden away that I thought would be a better weight visually for it and I think I’m much happier with it now!  The funny about this is, it’s pink. January’s prompt if you got stuck for an idea on making for the week was Pink lol but now that we’re in February, the color is red! Ever the rebel!

Wind Dancer Studios: On Revisiting A Charmed Piece; After
After: Doubly Charmed


The second choker takes the leather and the wooden bead I removed from the first and shortens it just a little bit for feathers. You might remember some of these from another blog post as well. I discovered them again while cleaning up my desk and really like the idea of them being charms. They remind me of my best friends and that makes me happy.

Speaking of happy, this was in my Facebook feed the other day.

A Little Play on Words


I would decorate my domicile, dine on delectables, and discuss things with the Dalai Llama on a day trip to the Dutch Antilles and I could dot the landscape with Dahlias, Daisies, Day Lilies, and Daffodils…..

This was a lot of fun! It almost reminds me of the plan a day in your future life, but using only one letter instead of scheduling time slots makes it easier. I almost want to go through the alphabet just to see what I can come up with! Could be a fun pick me up on those days where you feel a little blah. 

Thanks for stopping by!
We'll see ya next week!

Friday, September 25, 2015

Change it up Blog Hop


Wow! I was beginning to think I wasn’t ever going to get this finished! I couldn’t seem to get started, I kept getting interrupted or frustrated so it took days to make and then just as it was all finally starting to fall into place, my camera died. Right after taking a couple of the most gorgeous clear pictures it has taken in a very long time. Well, since it went for a swim in my coffee anyway.

The bright side is I discovered that little slot on the side of my laptop that looked like it might be the right size for a memory card, is in fact the right size for a memory card! It seems not all the photos saved but I did get the photos that had saved uploaded! Yay! 

Just in case you aren’t aware, here’s how this hop works. Brenda Sue of B’Sues Boutique has given us a choice of four items to play with.  These cuties:


MagPie Approved: Wind Dancer Studios / B'Sues Change it Up Blog Hop Choices
Change it Up Choices


Our job is to look at them from a different perspective. cut them up or use them in a different manner than you normally would. Keeping the months challenge theme in the B’Sue’s FB group in mind. Septembers challenge btw is Vintage.

I chose the cuff in the bottom right corner.  I don’t normally do cuffs, in fact the only cuff I’ve ever made was for the Build a Line Challenge in the beginning of the year.


MagPie Approved: Wind Dancer Studios Muchas Musings Cuff
My Cuff from Build a Line

 
First challenge, what the heck am I going to make with it? I’m actually ok with making a cuff with it because, I don’t usually make them so for me that is different but I can't just form it, that isn’t really out the box. I thought to myself, Oh I have a piece of Prehnite that would make a great focal, I’ll use that!

MagPie Approved: Wind Dancer Studios Prehnite
Prehnite Pendant


So I cut the filigree in half intending to create a focal with the Prehnite.

Challenge number two…….. the Prehnite is curved both front and back. The cuff would also be curved….. in the opposite direction. No matter how I worked it in my head there was too much air between the stone and the metal. So there I sat, with a cut up piece of filigree, a stone that won’t work and a piece of brass I had intended as a back plate. What to do what to do?


MagPie Approved: Wind Dancer Studios Prehnite Pendant Idea
Not going on the cuff, but Hey! This is a cute idea!


I’ll emboss it! But it needs to be annealed first and now the color is nowhere near as clear and bright as the filigree …….. ha fire for you too!

I’m now quite happy with my decision! Yay me!  I just need to attach everything. Rivets! I drill four holes and I just have four nail head rivets left.
oops dropped one, three left. Where on Earth did that rivet go? It was JUST in my hand! sigh Two rivets left. That isn’t going to work. I still had some balled copper rivets I made for my Dia Los Muertos necklace maybe I can make them work. Grabbed them up, flattened the heads and Tadaaa!! Worked great!

Until I realized I missed on the hole placement and the whole thing was too far over. I cut the rivets off except the one that wouldn’t come off the filigree. That one I had to redrill, through the rivet.

Flatten more rivets and finally we’re done! Woohoo! That’s when I remembered I bought a new packet of rivets from B’Sue when I bought the filigree for the hop…… face palm! I had a brand new pack just sitting there waiting for me all along.


This is my finished piece. I’ve never had one fight me so hard as this one has. Apparently the change it up for me wasn’t so much about the cuff as it was with having to continually come up with plan b, c, d, e, f lol 


I may play with it some more, add another rivet on either side and maybe a little embellishment but for now I’m happy with it. Both my son and my daughter like it and my hubs gave me the  "You made this?" seal of approval. And hey! I kinda like it too!

Please join me in thanking our Wonderful Hostess Brenda Sue and visiting the rest of the Hop participants.


List for Blog Hop September 25, 2015
Brenda Sue Lansdowne
Mary Deis
Jann Tague

Lori Beekman

Renee Hong

Cynthia Wainscott

Dana Hickey
Magpie Approved
You Are Here!!

Mary Beth Quigley-Spiker
Karen Eaton

Shari Gardner

Alison Huie

Pamela Anger

Carole Carlson

Cindy Peterson

Marcia Tuzzolino

Charlotte Smothers

Gillian Cunningham Wright

Catherine Shattuck

Clare Wells Nemeth

Erin Whitacre

Lynda O'Mara

Ginger Hammond
Lynn Leigh Designs

Ingrid Anderson
Deb Beechy
Harry Wood
Delyssa Maxwell

Paula Gaskill

Irene Hoffman
Alexandra Sefton
Leslie Carver


Thanks so much for stoppin by!
We'll see ya next time!


Tuesday, May 5, 2015

Inspiration

Wind Dancer Studios: Inspiration for Graduation Jewelry, #Inspiration
 My Inspiration  


Inspiration comes from many places. I've been talking a lot about inspiration lately I know, probably because my brain has shifted from make to plan mode.

It's been a bit of a whirlwind around here lately, what with awards receptions and end of school year everything. This coming weekend will be a really busy one for our household. My Daughter graduates college and starts a new job, my hubs has a birthday, and we have Mother's Day, boom boom boom just like that.

The kiddo and I are both planning on sewing new dresses for this weekend, which will of course require jewelry. I offered to make her some, but sadly the "trauma" of her high school graduation, and the inability to get off stage because the presenter was so smitten with the necklace I made for her, has made an indelible impression on her memory and she declined. She wants an easy on, thank you and easy off this go around.

I will just be making myself some pretties to wear and she can wear pearls.

So what does a paper bouquet, a spring meadow, polymer roses, a pretty wrapped gift and my daughters best Aladdin face have in common? They're my inspiration for the earrings I'm about to make. I think they're going to do triple duty for me, I'll have something really pretty to wear to the kiddos graduation, they'll do for my entry into the chandelier challenge B'Sues is having, and they'll also do nicely for the About Me entry for Year of Jewelry - see planning mode lol

Oh, you want to know how each is an inspiration? Sure! The paper bouquet inspires a cascade of flowers, the spring meadow brings gorgeous colors (my dress is gray) the polymer flowers are a free tutorial I found on Pinterest, the gift inspires the addition of pearls to the cascading flowers and the kiddo - she's the reason for it all.

Feel free o share your inspirations in the comments below, I'd like to know what inspires you?

See ya next week!


Tuesday, April 21, 2015

Inspiration is Everywhere Or I Write a Guest Blog Post

Wind Dancer Studios Inspiration in Every Day Items

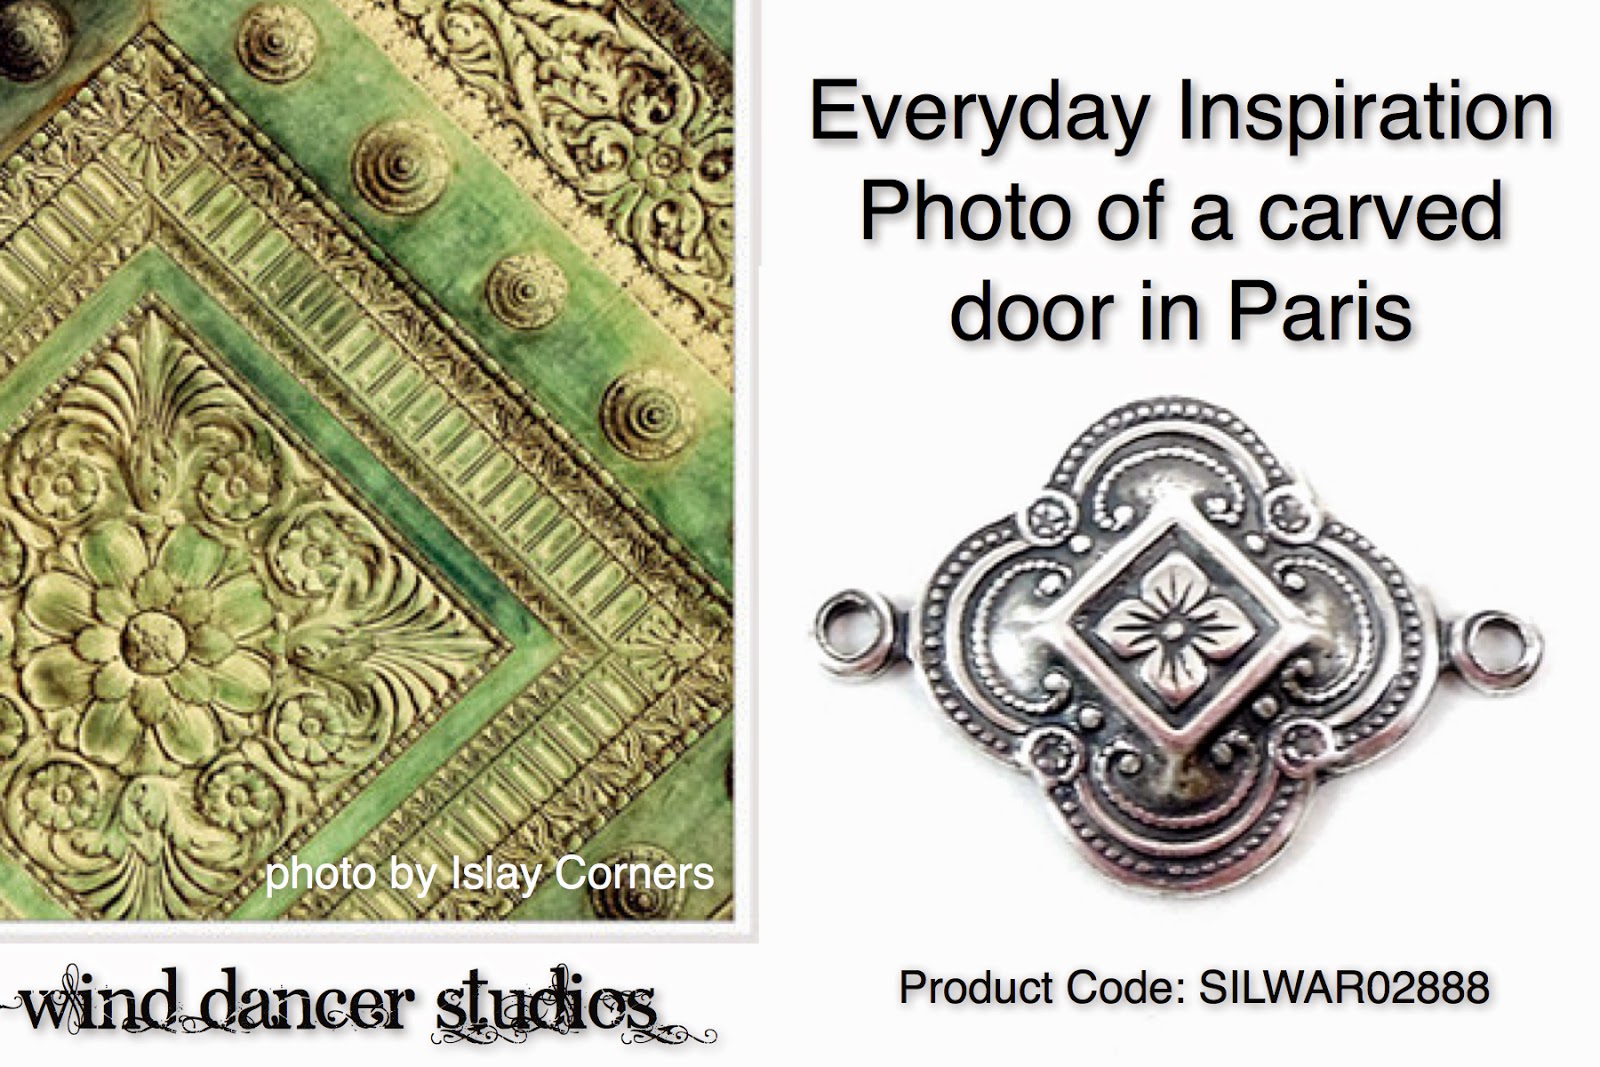
I see things a little differently than some people, I see design in everything. I see patterns, and colors, texture and movement. I see the potential to make something pretty, something mine. Like this wonderful photo of a Pariseienne door I found on Etsy. I love the carvings, the floral center, the diamond frame, and the little rosettes. That softly faded green of a natural aged patina. Just gorgeous. 

It immediately brought to mind this wonderful connector over on B'Sues website, with just a little touch of Swelligant or Gilder's Paste that patina could be given life on a really pretty piece of jewelry.  It would make for a truly gorgeous set.

It was the same when I saw the Dolce & Gabanna earrings I write about on B'Sues blog http://bsueboutiques.typepad.com/bsue_boutiques_jewelry_su/2015/04/finding-your-style-in-everyday-inspiration.html. The shapes immediately brought me to several of her brass filigrees. I knew how easily they would make up similar earrings.

As I created my inspiration earrings I could see how wonderfully the style would translate in an asymmetrical design.

Wind Dancer Studios, Asymmetrical Design

I loved Coral's earrings from the Build a Line Challenge, she created a beautiful asymmetrical design. Then I remembered this filigree pair from Mia Montgomery she mixes up both size and shapes but the design still balances beautifully.

If you'd like to see the earrings I made hop on over to Brenda's blog to take a peek and see the $800 earrings that inspired them.

Thanks for stopping by!
We'll see you next time!
Dana


Tuesday, April 7, 2015

How to Make Ear Wires or How Lefties Make Them - Me Anyway

hand crafted hollow bead earrings by wind dancer studios on Etsy, ear wire tutorial
Hollow Bead Earrings by Wind Dancer Studios


There are lots of ways to make ear wires and I use several of those methods myself. This is my go to method - it’s very basic and assumes you have some knowledge of working with wire and don’t need me to tell you cutters cut people too, files ruin manicures, and hammers hurt when you smash a thumb or fingernail.

I made a pair of hollow beads for the Year of Jewelry project  and thought hey! why not share how I make the ear wires for these? If my fingers look a little dirty that would be why, that and the glitter nail polish lol So I just grabbed the camera and shot photos as I worked. 

DISCLAIMER!!! I AM A LEFTIE, I use both hands when making jewelry so I don’t always realize when things might look backwards to you - if it looks backwards just mirror it and it should work out just fine! If you’re a leftie HI! isn’t it nice to know there are more of us?!

OK Let’s get started!

Step 1) Cut two pieces of 20 ga wire two inches long.

wind dancer studios ear wire tutorial step 1
I use Tronex Razor Flush Cutters I heart my Tronex!


Step 2)  Debur your ends on both ends. You can use a bur cup, fish hook sharpener or a nail file. Just file them smooth, nothing worse than sharp wires poking you in the ears. (ok maybe a few things..but…)

wind dancer studios ear wire tutorial step 2
Deburring with a cup bur
got mine at Fire Mountain Gems

wind dancer studios ear wire tutorial step 2
Demurring with a nail file 180 grit


Step 3) Straighten and work harden your wires. You can use nylon jaw pliers for this or use a bench block but I like rolling the wire between the anvil and an altoids tin or the ruler, whichever is closest at hand. There’s no curve to the wire once you’re done and it has a slight spring to it.

wind dancer studios ear wire tutorial step 3
Don't you love my baby anvil! It's so tiny!
Hubs found this one at a yard sale, my other one is 15 lbs
cast and sits on my other desk.

wind dancer studios ear wire tutorial step 3
Roll wire between anvil and ruler to straighten and work harden.


Step 4) On one end of each wire form simple loops, this will be where you add your dangle etc.

wind dancer studios ear wire tutorial step 4
Form a simple loop on one end.

wind dancer studios ear wire tutorial step 4
Simple loops, I didn't center the loops but you could.


Step 5) Take your bail making pliers and wrap both wires around the larger barrel leaving the tail longer.
You can use wood dowelling, a sharpie or a pencil, anything smooth and round.

wind dancer studios ear wire tutorial step 5
Forming wires on bail making pliers - large barrel side.
These are Bead Smith pliers.

wind dancer studios ear wire tutorial step 5
Form both wires at once so they match.


Step 6) Most people stop there but I like to go one more and slide my wires onto the smaller barrel and tuck the dangle side in for a tighter curl.

wind dancer studios ear wire tutorial step 6
Slide both wires onto smaller barrel for a tighter curl on the backside.


Step 7) At this point you can slide a bead onto the wire if you want. I like to add a little matching detail to my wire so they match my earrings.

wind dancer studios ear wire tutorial step 7
Adding a bead for color.


Step 8) Now grab the wire just behind the bead and give a little bend to help hold the bead in place. This also balances the wire a little bit so your dangles hang straight down.

wind dancer studios ear wire tutorial step 8
Securing the bead in place.
I'm using Wubbers Chain Nose pliers.


Step 9) Place your ear wire on the anvil or bench block and give the backside of the curve a little tap. This hardens the curve and helps it keep its shape. Some people don’t like the flattened wire, especially with a heavy earring, to keep the wire round use a rubber mallet or a leather mallet instead. Both will harden your wire without distorting it’s shape.

wind dancer studios ear wire tutorial step 9
Hardening the back edge. I'm using a finish hammer,
it has a slightly domed smooth face with no hard edges.
Sometimes I steal the hubs MAC chasing hammer
for auto body work, it has a much smaller head, great for
precision work!


Step 10)All that’s left is to add your dangle and voila you have just made your own ear wires.

wind dancer studios ear wire tutorial step 10
TaDaaa!
hand crafted hollow bead earrings by wind dancer studios on Etsy
Hollow Bead Earrings by Wind Dancer Studios


Please excuse the stacked trays in the background, I just realized they were there lol I was using those to keep my components together as I worked on my Muchas Musings Lines. They allowed me to keep components with the sketches so I wasn't constantly looking for where they went. Take out tubs are AWESOME for this, lids and see through.

I hope you enjoyed seeing me make these and if you did please leave a comment. 
Comments will encourage me to retake those photos for the rose tutorial......

Thanks for stopping by!
We'll see you next time!