Showing posts with label wire. Show all posts

Tuesday, March 22, 2016

Leather! I’ve Got More Leather!!

I received this glorious box of leather from Endless Leather last week.
 Just look at all the gorgeous goodies! I can’t wait to get in there and create some beautiful jewelry with it! You can’t really see it in these pictures but the cork has gold and silver in it, it is sooooo pretty! 

I have ideas, oh do I have ideas!!


Here I am with this box of gorgeous cords and still kind of stuck for an idea for this weeks Year of Jewelry piece. We even have color prompts for stuck weeks and that didn’t get the ball rolling. I looked on the desk at my UFO’s and meh I don’t feel like stringing, or weaving, I made simple earrings last week, what to do what to do? Hmmm what do I have left in this basket? Oh yeah! The embossed butterfly…… I wonder if some of the blue leather will match the turquoise color of the glass beads. 

Perfect match!


This is a Nappa Leather cord  and oh my, this is some of the softest leather I’ve ever felt, and it lays along the neck just beautifully.


I’ve got all kinds of ideas from bracelet wraps to necklaces for this gorgeous gorgeous stuff! You’ll be seeing lots more of this as I have a couple different colors and I’m really excited about using more of it.

Before I leave you for the week, let me share a little funny.

The hubs and I have been having some very serious discussions as of late, this morning was no exception. I got up walked over to him. Held his face in my hands and raised up to tip toes so I could look him in the eyes. I say to him "I love you. I need you to know that I know you have....F'ING CALVES!" Both calves cramp up dropping me to my knees, still holding his face in my hands we both twist over. The hubs cracks up, this intense romantic moment has been turned into much needed comic relief. He looks me in the eyes and says  " We are a pair, and this is our life"  I do love that man.

Cherish these moments, these are the ones that keep you going when all else feels lost.

Thanks for stopping by!
We'll see you next time!

Tuesday, July 14, 2015

Left Handed Loop Tutorial

Loops and wrapped loops are something quite a few beginning jewelers struggle with. The headpins purchased at most craft departments are steel and don't bend easily, making them think they are doing something wrong or just aren't very good at jewelers making. A nice loop does take a little practice and armed with a little how to and the proper tools it can be done quite easily.

To get started you will need wire or purchased head pins and a pair of round nose pliers
http://www.firemountaingems.com/itemdetails/h203181tl

or forming pliers
http://www.firemountaingems.com/itemdetails/h203512tl

and a pair of chain nose pliers.
http://www.firemountaingems.com/itemdetails/h204666tl

flush cutter

and optional crimping plier


These days they have a one step looper tool -
http://www.bsueboutiques.com/product-p/looper01622.htm


but it won't make wrapped loops, those you still have to make yourself and I'm going to give you a quick tour of how I go about making them.

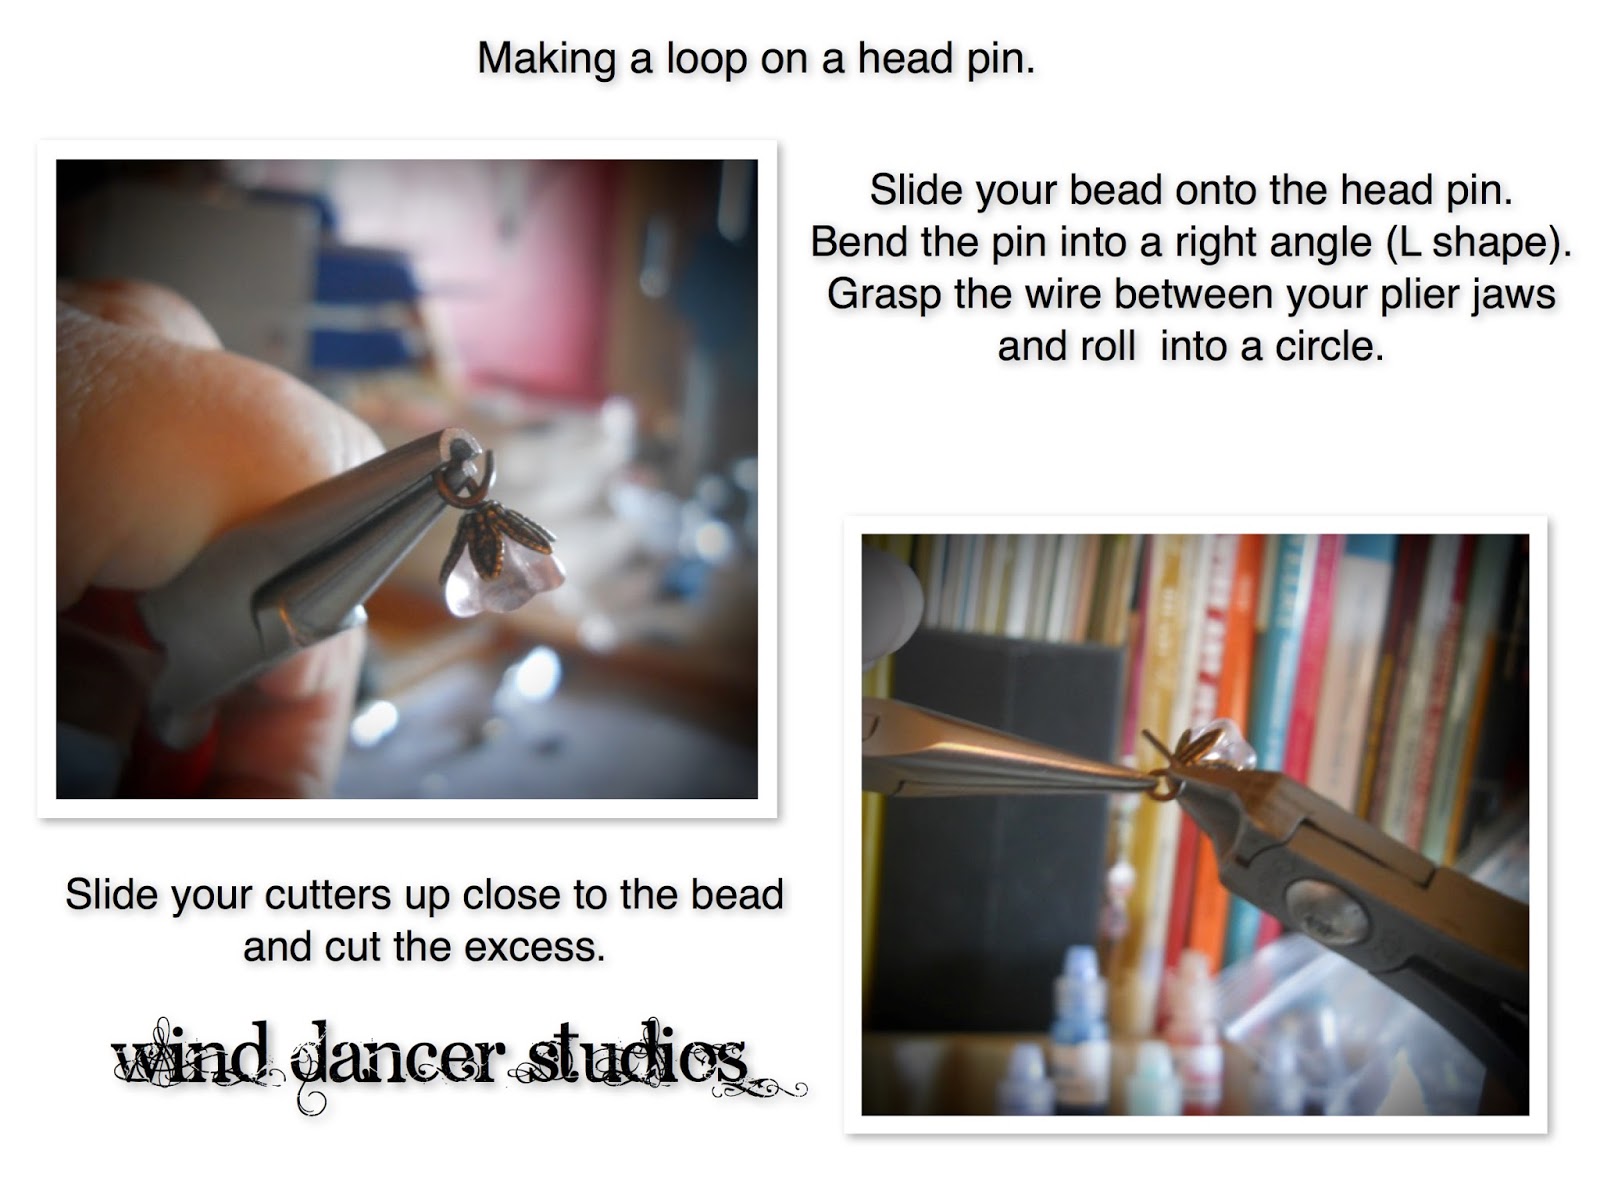
To make a simple loop drop a bead onto your head pin and using your thumb bend the wire over the top of the bead in an upside down L. The bead being on the straight portion. Grab the wire between the jaws of the pliers and roll.


Making a loop on a Head pin, WindDancer Studios, free tutorial
Using a head pin.


Continue rolling until it looks like a lollipop.
Trim the excess.

To make a link you'll do the same but loop both ends. Generally when making links I'll slide quite a few beads onto the wire and work from the roll. This saves time and wire.


Wind Dancer Studios, free tutorial, simple loop link
Using round nose pliers to make a simple loop link

Wind Dancer Studios, free tutorial, simple loop link
Using Forming Pliers to make a link.


To make a wrapped loop you'll do pretty much the same thing but you need to leave a space next to the bead for your wraps.

Wind Dancer Studios, free tutorial, wrapped loop link
Making a Wrapped Loop Link


This time we'll place our pliers next to the bead and rock it to the side. The tip of your plier leaves a little space between the bead and the bend.

Wrap the wire around the tips of your plier until you have your lollipop but don't cut the tail.

Grab the tail with your chain nose pliers and wrap it around the space beneath the loop. Wrap as straight across as you can and fill the space.

Trim the excess and tuck the end in close to the wraps with your chain nose pliers.

Sometimes wraps can be a little uneven or the tail just doesn't want to tuck all the way in.  A helpful hint in these cases is to use your crimping pliers and very gently squeeze around the wraps and tail end to even them out and tuck the tail.

Can you spot the wonky links?
Got going too fast on those....now I have to fix them.


The links I found for the pliers had great pictures that showed the pliers tips so you know what you're looking for. I also turned myself into a contortionist so you might have a better view of the plier tips as I worked. There are a full range of product price points and you should purchase what you are comfortable spending as you will get what you pay for when it comes to pliers. I have some really nice very expensive pliers that I absolutely love, I have some mid range pliers that are very nice and fit my hand beautifully and I have regular hardware store pliers that I've owned for many many years, they all do the job I want of them. Treat your toys and tools with respect and they'll last a long time.

I thought you might like also like to see a video of a right hander so you can see the motions. I often use both hands switching back and forth without thought so I thought this might help to see it both ways.


I hope you find this helpful or know of someone who might.

Thanks for stopping by!
We'll see you next time!

Tuesday, February 3, 2015

A Little Bit of This A Little Bit of That

I've had the flu so it wasn't until just now that I realized I had no blog post! Yikes! Time to stock up on some posts again, I like having backups for just this kind of occasion.

award winning hand thrown pottery rtistic impressions on Etsy
She WON and Sold it!


News On the Home Front:

This weekend the kiddo was in her first Art Show outside of the University. She almost didn't enter as several of her friends whom she thinks are incredibly talented had entered and she thought she didn't have a chance. Good Mom that I am told her to knock it off, she is talented and she will never know until she tries just how talented she is. Well, kiddo took third! Yup she WON.  Insert Puffed Chest here, I am one Proud Mama! and may I say, the kiddo suddenly feels a little more talented, a lot more like a REAL artist (her words) and quite validated. Oh, the vase she entered also sold! Yup! Her goals for this semester are to make enough money to buy her own kiln, I'd say she's off to a great start!

Oh and on a completely sweet note.... kiddos BFF is getting ready to bring her little man into the world and welcome him into her arms. We're wishing her all the love in the world.

On the Desk:

I've been working away on the Year of Jewelry meeting my weekly deadlines. Some pieces I'm thrilled with, others are a learning experience. so all in all a good thing so far. This last week I doubled up, YoJ theme was squares and my first finished piece for B'Sue's Build a Line just happened to fit the bill. I like this piece a lot. I think it fits well with my existing stock and adds to my line beautifully.

Double Duty Squares and B'Sue Build a Line


speaking of  B'Sues Build a Line:

As you just read I've been working away. Lots of new goodies finding their way into the light of day. I'm excited about this new line. I love the style, I love the lines, I love how well it meshes with my shop and I'm excited for the cohesion and polish I believe it will bring with it. Two months is a long time to wait for unveiling but it gives ME lots of time to fine tune and write wonderful copy to go with.

In the Works:

I think it's time to have some professionally printed cards made up. I've been printing at home as needed and that has worked well but the computers update wasn't compatible with the software and the timing is serendipitous. I'm pretty sure I mentioned I've joined the Artisan Group. I'd like to have memorable cards to go along with that nice cohesive shop. New cards are officially on the To Do list.

Til Next time!
Thanks for stoppin by!


Tuesday, October 14, 2014

Playing with Fire and Leather

It's been a bit busy around here this last week and as a result I missed my blog post. Busy is a good thing around here though and I am not complaining!

I played a bit last week. Picking up scraps of this and that, little bits of things I twisted up, sawed off, and bought. Put flame to some and wire to others. All in all a productive week and I enjoyed myself to boot!

Originally I had thought I might just play with an idea I got from this tutorial over on the House of Gems Pinterest board. I had two pieces of leftover copper I had sawn off another project and I thought it might be fun to dangle some chain from them.

Since I was playing, I thought why not emboss them? They're a slightly heavier gauge metal so I knew I'd have to anneal first. I lit the torch and thought.... why not play a bit with fire painting, I have to torch it to anneal it anyway. (You're getting a real good look at how my brain works here) So I torch and get some really pretty purples YAY! And I emboss and get great matching imprints for a pair of earrings. Next up we'll drill holes to hang the chain from. Zip zip zip and done woohoo.

I'm really liking the iridescence of the purples.............. I think I have some daggers with that color.
Yup! Then I notice a little piece of wire I had looped up and it fit so nicely into the arc of the shield, so I made another and I really liked it. At this point no matter how I played with that chain I just didn't like it. Too bad too, I had planned on suspending the whole thing from that chain....hmmmm

I really like the rib bone chain I made for my Dia de los Muertos piece and the bars Dana sent for bead soup... I could make some bars to hang these from! So I did....  I played a little too long before sealing so I lost a bit of the deeper shades but they're still really pretty!

flame painted copper shield earrings
Flame Painted Shields


Next up I decided to play with my leather scraps. Rebeka Payne of Tree Wings Studio has these leather feathers that I absolutely adore, I though I might play some and make my own feathers. I even got the kiddo in on it and gave him a piece of leather to play with while I cut and designed a few things. He LOVED it!  and I loved it.

The color of the first feathers I made were the exact shade of the stone I've been playing with the woven bezel for the last couple weeks and I just happened to have one wire left I had no idea what to do with, and tadaaa!

Copper and Leather Wrapped and Woven
Alex claimed this one just as fast as I was able to get those feathers on it.
I've made up several more feathers and have many more ideas for them already. 

Thanks for stopping by!
We'll see you next time!


Wednesday, September 17, 2014

Less Than Wordy

I try to post on Tuesdays. I even have the monthly Birthstone posts to make sure I always have a topic, but sometimes there just are no words to write.

It's not that I'm not feeling creative, I've been busy working away. I just finished up a necklace I'm hoping Stringing Magazine will like. I'm just not feeling terribly wordy.

So...... um.....let's see, something worthy of posting about.... I hosted this month's giveaway in the forum. Or basically in our group on FB. Since about.com changed everything up AGAIN the forum has pretty much been dealt its death blow. Sad, it used to be a hopping place. You could barely keep up with all the posting, now crickets, crickets dropping pins.  Anyway, I used random.org very cool little website I let it pick a number based on the entries and then listed all the entries and had it randomize those and ..... Anne won!  I'll be sending her these little beauties. Pendant made by moi - that little tree of life kick I was telling you about :) A pair of agate hearts, some freshwater pearls, and some moonstone, in grays and peach. Not a huge prize package but enough to get a little inspiration going and I'm sure Anne will make something beautiful with it.


Maybe a kitty post next week or birthstones, who knows?

Thanks for stoppin by!
We'll see ya next time!

Tuesday, September 2, 2014

The Only Thing I Melted This Week....

was something I meant to! Yay Me!! I finally got my earrings finished, plan B came along quite nicely. Good thing too, melting those earrings really hurt my feelings and my confidence. I didn't realize how much until I finally finished them. Thankfully Plan B actually came out much cuter than the original.

I've always thought of these types of happenings to be fortuitous. If I hadn't melted the first pair, they might not have been quite as cute. I really do prefer the copper background over the brass. But it sure can make you feel a little "less than" and cause a little struggle while you push through. But persist, you must, in the end it's always worth it.

tree of life earrings, copper, bronze, rose gold and shell
Commissioned Tree of Life Earrings

A jewelry acquaintance of mine Heidi Kingman decided it was time to declutter her supplies. A little make room for more of what I want kind of thing. She had quite a few really pretty stones up for grabs and I managed to pick up a couple. 

My son was sitting at the table as I opened the package. He picks up one of the stones, holds it for a moment, turns it over and holds it again. Finally stating, this one is mine. When the stone speaks to you in this house, you listen lol

Last night I sat down and turned that stone into a little something for him. Now, I'm a Virgo and I really like nice and neat and symmetrical, it is hard for me to leave a wonky wrap or an unbalanced anything. I wince and cringe when I notice something in a photo that you will not see in the hand. 

I had created these nice, neat, wonderfully matched little loops as I netted around that stone. Then my fingers started cramping and it got hard to hold the stone as I worked. I flipped it and dropped it, muttered something under my breath. Stretched my fingers, straightened the netting and started again. 

Again my fingers cramped up and then locked, the stone went flying through the air and I smashed the netted bezel in my hand. Flustered I might have muttered something a little stronger this time. 

I stretched the netting back around the stone. I stretched my fingers. I started again, one more time. I felt my fingers start to cramp, stopped before they locked. I thought that might save the stone but no, fingers locked and stone flew.

I only needed two more loops to finish the round and I'm fighting back the tears of frustration. Stretch my fingers, make two loops, bind off. Stretch the bezel around the stone, it's not as neat as it was - BUT it looks appropriate. It looks as if I planned it. It's asymmetrical and organic and somehow looks so much better than those neat little rows of perfect loops. Whats more, I like it! My hands hurt too much to do anymore though so I put it aside until this morning.

Leather, copper and fine silver feather, netted stone pendant
Alex's Feathered Stone
This morning I cut a piece of copper into a feather and fused some fine silver into it for the finishing touch. He's quite happy with it and already has it hanging up next to the dagger pendant and his cross.

I'm this month's host for our small group giveaway so I'd better get busy choosing a prize. Considering making a pendant if my fingers will let me o_O if not I'll take a peek into that stash of glass and rocks I have right over there.

Thanks for taking a peek and for visiting with me!
We'll see you next time!


Tuesday, August 19, 2014

My First Spinner/Fidget Ring


It's been a torching kind of week around the studio as I've been working on a pair of commissioned earrings. Sometimes when I get to a point where I'm really happy with the progression of a design I need to take a step back and work on something else. Sounds a little backwards doesn't it?

Honestly when I'm really happy I feel the need to psyche myself up to take the next step when it involves the flame. Fire melts metal. I know this because that's how I make all those balled headpins.

This weekend as I psyched myself up I made several rings, a couple twisted copper rings and my first spinner ring. I have a chart around here somewhere that gives lengths and ratios and all that really necessary stuff for getting the proper fit but I didn't pull that out, noooo I had to wing it! Which really isn't as bad as it sounds, I have a pretty good memory I just didn't remember the difference in length between the wide band and the spinner band so the first band was too small and the second tried to scare me by sliding off as I checked the flare haha! Bad spinner!

Even though I managed to split the seam a little, just as I was finishing up flaring the band, I am really happy with the results. Alex has claimed this one for his own, I wore it for awhile and it really is pretty comfy to wear and since I do fidget with my rings it was right up my alley.

What about those earrings you ask? Well, my fear of melting something is actually well founded. I got the first earring put together and started soldering the second. I got too aggressive with the flame and poof she melted. So now instead of having a pair of gorgeous earrings, I have a very cool pendant. I'll start pair number two here in just a few. Plan B involves no flames, I think I'll work on those first and then maybe I'll come back to Plan A. After all, a full set would be really pretty!

Thanks for stoppin by!
We'll see you next time!

Tuesday, July 22, 2014

A WISH for you! A WISH for me!

Wind Swept Fairy w/Dandelion
Found on Pinterest

I was surfing around on Facebook the other day and found this absolutely gorgeous "wind dancer" She spins in the wind, just an awesome find and I was immediately enamored. I love everything about her (except her toes, they're too long but that's just my sense of aesthetics) anyway toes aside she's perfect. So I poke around the page and marvel at all the sculpture, it makes me want to touch. To stand and stare and caress the lines. Yes folks, in my little art world that is LOVE. The need to touch and feel, to see and smell. To bask in it's glory.

Fantasy Wire on FB
A single Dandelion Seed
Then I come across these. Oh my........ I can afford this. I want this. I need this. It's a what? A wish?


This is a WISH
Found here: Bits and Pieces


No no no. THIS IS A WISH! I have absolutely no idea what plant it comes from. But all my life I've known THIS to be a wish. It's about an inch to an inch and a half in diameter and no stem.  Just a little smaller than the photo suggests, but not much. You catch it blowing about on the breeze. Hold it very gently in your hands, so as not to crush it. Make your wish, and release it back onto the breeze. It's very magical when you're a child and I haven't seen one in years, not since my own children were small when I showed them how to catch one and release it.

Oh, You *can* make a wish on a Dandelion, my kids did it quite often! So did I. How many breaths it takes to blow the seeds away is how long it takes for it to come true, sort of like birthday candles. But in my world, it isn't a wish any more than a star is, it's what you make a wish on.

Nevertheless, I do love this dandelion seed. I may just have to buy one. Or at the very least make one for my desk. I have a small fairy sculpture in my garden and my daughter has an abstract sculpture started that she wants to place in my garden. I think a fairy shoe and another fairy or two are definitely in order, maybe even a dandelion seed. Then I can wish that someday I might own a sweet little "wind dancer" of my own.

Friday, July 18, 2014

25 Sketches #7

Skipping a sketch - not really it's still in progress on my desk but these gold and pink beads were calling. I've actually had this color combo on my radar for months and when I finally had them on my desk they demanded I play NOW!

I gave a preview of the beads on Facebook last week but it's been a busy time around here with lots of really good things happening and I kind of slacked on my Facebook postings. Here too obviously as it's Friday as I write this...ooops!

Beads!
25 sketches #7
Sketch number 7 & Beads
and the finished earrings!

Sketch number 7 Earrings

I rather like these and am really glad I decided to listen to those little beads. I'm also really enjoying working with my sketches again and am really happy to see them coming to fruition and am looking forward to sharing number 6 with you next week.

My advanced copy of Tammy Powley's book arrived and I have two pieces of jewelry on page 275! woohooo me! I bounced off the walls pretty good for a couple days off that one :) 

and...... today is my middle child's 21st birthday! We live in a dry county (No Alcohol - yes those places still exist) so we made a Rum run to the next county over and will be making Strawberry Daiquiris tonight. Normally birthday dinners are decided by the person whose birthday it is, but she doesn't seem to be able to decide what she wants...... so who knows what we'll be having. We may eat while she drinks lol 

All in all a good week! Here's hoping yours is/has been as well!

Thanks for stoppin by!
We'll see ya next time!


Tuesday, July 8, 2014

July's Birthstone = Ruby

Here's hoping those of you in the US enjoyed your long weekend this past week! This month's birthstone is RUBY! My middle child's birthstone, I love red it's an exciting color, her not so much lol Then again Peridot is mine and I rather like Ruby - grass is always greener isn't it? or redder as the case may be.


The glowing Ruby shall adorn,

Those who in July are born;
Then they'll be exempt and free
From love's doubts and anxiety.

Turquoise and Onyx were the recognized birthstones up until 1912 when it became the Ruby.

I did not know that! I just assumed it had always been Ruby. The kiddo might  be on to something there.

I have a Ruby in Zoisite artisan cut cab, but we're waiting for my Muse to whisper it's inspiration to me for its design. Pretty little stone with it's greens and reds.

In the meantime a Ruby Red treasury for you to enjoy.


Ruby Reds on Etsy


Brass FIligree Ring w/ Ruby Red Heart
Brass Filigree Ring w/ Ruby Red Heart
Drops of Red Vintage Button Ring
Drops of Red


Thanks for Stoppin' by!
We'll see ya next time!

Tuesday, June 17, 2014

What's on the Desk

It’s been awhile since I’ve posted a what’s on my desk post, and thought I might share with you what I’m currently working on.
On my desk, as usual, are several UFO’s. More accurately several projects I have pulled beads for but have not yet begun making. 
Including leftover pieces to a refashion and two UFO’s, one of those in the midst of a refashion itself. I thought I had finished it but I never really loved it. I pulled the bird off it to send out with bead soup and have finally decided why I didn’t like it and what I need to do to fix it. I pulled beads and made a new bird, but that’s as far as I’ve gotten with it. Last of course that poor necklace that has been sitting on my bead board for well over a year now. If I didn’t think the finished piece was going to be beautiful I might scrap the idea and start over but I really do think it’s going to be beautiful …… when I do eventually get back to it.

Beads pulled for  #6


These are the beads I have pulled for sketch number six. I started with this wonderful little stone bead I received from my friend Anne on the Jewelry Making forum. She hinted the beads she sent might look wonderful in filigree and I have to agree.

I had drawn the sketch for the focal and then realized I already had a sketch in my “to do” pile. A couple very small tweaks to the sketch giving it a little more filigree and it easily became number six. I think this one is going to be a really pretty necklace once I get through the take away stage. I love the crystals and the picasso beads but I just haven’t decided if I want them together yet. I think I’ll use gold wire for this one, the gold section in my shop is still a lliiiittle light. In any case, I think those gorgeous soft greens and blues really really call for gold and I’m happy to listen.

On the home front….. jump up and down with me and do the happy dance people! We FINALLY have one room completely finished!!! Unless of course I decide to add crown molding lol It is such a good feeling to have one 100% done, no trim pieces waiting, no paint, no flooring, it’s all done! Here’s to the next one, whichever room it is!

Thanks for stoppin by!
We’ll see you next time!

Tuesday, June 10, 2014

Junes Birthstone: Pearls

Can you believe it's June already? Me neither! Half the year has flown by, just that fast! For those  still hopping away (ahem like me albeit rather slowly at this point - sorry guys!) Bead Soup is HERE

Pearls are the featured birthstone this month.

But as our poem shows that wasn't always the case.......

Who comes with summer to this earth,
And owes to June her hour of birth,
With ring of agate on her hand
Can health, wealth, and long life command.

Cat's Eye, Turquoise and Agate were the accepted stones from the 15th through the 20th centuries. Not bad choices, they're all very pretty stones, and hey! Who wouldn't want to command a long, healthy and wealthy life?! However, come 1912 Pearl and Moonstone replaced the previous stones. Maybe as a nod to Wedding Whites, and a little romantic moon gazing?
As of 2013 Alexandrite has been added to the list, bringing the count back up to three.

I have two er three treasuries to share with you this month. As you may or may not know I am a member of Self Representing Artists in Jewelry Design (SRAJD for short) I was featured in the second treasury along with a few of my fellow SRAJD artisans and their pearl creations and the third is one I created of my fellow SRAJD artisans.


June Finds for June Brides and pearly whites
June's Blush on Etsy


June Birthstone of Pearls
June's SRAJD Pearls


This is one birthstone I have used fairly often in my designs, in fresh water, glass and vintage faux varieties. Using Potato, Mostly Round, Mabe (including uncut blisters) and Button shapes. Nineteen listings in my Etsy shop might be a bit much to share with you here, since at least 10 of those listings have already been shared here on this blog for blog hop reveals and my woohoo moment with Bead & Button ( I need to start submitting again, I really enjoyed creating with a magazine in mind ) I think I'll just post one or two.......well maybe three you know to match three treasuries .....

fresh water pearls, smokey quartz, moonstone, crystal and mother of pearl earrings
Clustered Pearls, Moonstone, Smokey Quartz Earrings


Vintage Faux Pearl and Glass Pearl Earrings
Vintage Faux Pearls


Glass Pearl and Crystal Earrings


You can click here if you'd like to see ALL 19 PEARL LISTINGS Happy June!
Thanks for stoppin by!
We'll see you next time!


Tuesday, June 3, 2014

25 Sketches

25 Sketches: Designs 2, 3, 4, & 5

  Todays post offers up #s 2, 3, 4, & 5 of my series of 25 sketches. Ideas hoarded away and finding their way into the light of day.  IF you were actually looking for my Bead Soup Post it can be found HERE!

Brass Fan Earrings with Cognac Quartz
Brass Lotus/Fans

 Sketches two and three were a no brainer. My muse demanded designs in Boho and that they were. I’ve often said inspiration comes from everywhere. I sew or I did quite a lot when my kids were much smaller. So when they out grew some favorite piece of clothing I would try to find a way to extend its life. Sometimes it meant shirts turned into throw pillows, sometimes it meant pants were turned into shorts and sometimes I didn’t get to something in the mending basket before it was completely outgrown. This was the case with a pink poncho/shawl and an embroidered paisley pant leg - a favorite outfit of my younger daughter.  That long forgotten pant leg was the driving force behind the original sketches, Bead Soup the vehicle my Muse used to bring the idea to fruition. She’s a smart one and at times can be quite persistent, and I’m thankful for it! :)

Brass Paisley Earrings with Peach Pearls & Leather Tassel
Brass Paisley with Pearls and Leather Tassel

 I make what I love, which pretty much means everything in my shop is from my heart. But, as in all things, we evolve. From time to time there may be an item or two in my shop that no longer reflects my current abilities. Loving what I have made, it makes me sad to think I could do better. So I’ll add a small flourish, a twisted ring or two, a back plate, tighten a twist or a wrap,  and sometimes it means taking the piece back to the original idea I had in the first place before I ran in another direction with it! This is the case with the second two sketches I'm sharing today. 

Three Copper Hearts Necklace
Trio of Copper Hearts

 The trio of hearts has been in the shop for some time. While I loved the rustic feel of them - I’ve been leaning more in a romantic boho direction. Classics given a touch of whimsy and added elegance in twists and turns. 
This particular sketch was an idea I was playing with using a key as the focal but as I tightened the twists in the hearts I realized the twining in them was what was really needed for the trio.

Sterling Silver Hoop Earrings
Silver Hoops

The hoops were simply a matter of finally working out that a small jump ring was all I needed to give the ear wire the flex I wanted without sacrificing the arc. A V-8 moment if you will. I have a pair of woven hoops in the shop that may get the same treatment in time as they have the same type of ear wire.

I hope you've enjoyed your peek into a few more of my sketches and design processes. 5 down and 20 to go! 

Thanks for stoppin' by!
We'll see ya next time!

Saturday, May 10, 2014

Bead Soup Blog Party #8 Reveal Beckoning Bohemian

Welcome to Bead Soup Blog Party number 8. The reveal date has finally rolled around and I am excited to show you all that I have made. This is my fourth time participating in the party and I have found it every bit as inspiring as the first, second and third times. This year my partner is Dana James, I wrote a quick blog post introducing her to you here.


She sent these wonderful soup ingredients that just called Bohemian to me, and when I say called I don’t mean whispered. My muse was very clear this was the direction we were taking, and then she went into creative overdrive…………

Together we made armloads of bracelets.

memory wire bracelets/anklets, colorful bangles, copper & leather cuff


I had never played with memory wire, can you believe it? The stuff has been around for nearly as long as I have been playing with beads and I have never even touched the stuff. Not even once. I had in my mind’s eye stackers. armloads of pretty. I started with the teals, inspired by those gorgeous blues in the lampworked beads. Added those sweet sweet floral head pins and Hey, as long as we’re making stackers, let’s play! I grabbed up many feet of aluminum electrical ground wire riveting the ends together and wrapping the resulting o’s with yards of colorful threads and pearls, adding beads and bells for loads of super lightweight, super colorful, super happy bangles. Super right? We were going to town making these fun little things and it dawned on me, I hadn’t touched a single soup bead since bracelet number one - gasp! Never fear my dear, these are meant for stacking together!!
Returning to the memory wire this time I worked in earth tones picking up the subtler colors in those gorgeous lamp worked beads.

Ready to get in some metal work I made up some textured copper strips and wrapped up some leather fully intending to use one of the clasps Dana had sent. But when I was ready for it, the clasp just didn’t seem to work, sigh. Not one to argue with my muse I finished the clasp using a piece of the leftover copper and textured it so that it matched beautifully. 

I remembered I had this great little bracelet wire from the Bead n Button design challenge that I hadn’t gotten around to using and what better way to showcase one of those lamps than that? I added a stamped filigree, a little flower with crystal center, and a Czech picasso leaf. Just sweet!


Then I made some connectors and played with those cool little copper bars and beads Dana sent. They looked really good with the larger lampworked beads and bracelet number 14 was born. This time I did use one of the clasps Dana sent :)

I had sketched up a design for the focal and ordered the bits I needed from B’Sues. I finished out the detailing while waiting in the lobby at the Drs office while the hubs was getting his eyes dilated. I had planned on etching the mehndi style designs but all I managed to do was discolor the metal ;/ hmmm


While I contemplated discolored metal I formed and forged some frames then wrapped up a couple pair of earrings. I LOVE these earrings. The first pair have Cognac hydro quartz and matching crystals from the soup stash and the second feature those sweet peach pearls Dana sent.

Brass choker - lace & flowers in brass and copper


Back to work on the focal I decided I would engrave it instead. Using a dremel and very slow speeds I did something I thought I could not do, I engraved a straight line. Seriously, I once answered a question about engraving with a no you can’t use a dremel, you need special tools……. ahem I stand corrected. ( I think I might really want those special tools now though - engraving is kinda fun!! )

So I engraved not just front but back. Riveted vintage opals and wired the brass lace into place. I added hand made flowers again with crystal centers and a short length of crystal beaded chain.

At this point I thought I was done. I had very little soup left, bullet casings, crystal points, a clasp, pearls and crystals. I so wanted to make one of those cool bullet casing points but the points are 1 mm too big ONE. The hubs says you just need to stretch the casing. LOL That’s all….. the muse leans over and says I have an idea…..

brass and copper dragon entwined around a quartz crystal point


….. and a dragon was born. The focal piece was my favorite up until this point. Pun not intended! I wrapped the point in a strip of engraved brass, followed by a woven strip reaching up behind into wings. At least it did. I didn’t like the way the one wing was sitting. I thought it was too low. I’m using brass, brass is a fairly hard metal and is brittle when work hardened. I gave a slight bend to the wire, and snap! off came the wing. I had to take the whole thing apart and rework the game plan. This is one of those times when uh oh is truly to your advantage. I made a second pair of wings and sawed a new head added vining swirls to the end of the bale to make the back as interesting as the front and wow! Even my son loves this guy. And look….. the second clasp found its way in too!

At the time of this writing I still have several days until reveal……… I wouldn’t be surprised if another little something found its way into this post as my muse doesn’t think we’re quite finished yet :D

As I was saying with the delay I had several extra days to play! And play I did, I finished up two UFO's you can see that post here (fortunate I did too, as I needed a blog post lol)  AND look at that! Two more pair of earrings found their way into the blog party!

forged and wrapped brass hoops, woven and scrolled brass copper and smokey quartz dangles

First pair is a simple forged pair of brass hoops wrapped with a peach pearl and the second woven and vined brass and copper with smokey quartz and crystal.

I still have quite a few ideas swimming, seriously inspiring this round, BUT it's only a few hours away until reveal. Yesterday was the hubs birthday and Mother's Day is this weekend. I think I'll play with my muse again in a couple days, right now I think I'll spend some quality time with my family and start hopping bright and early - or after I've had a couple sips of coffee  and can form coherent sentences!  :)

We have close to 500 participants again this year… wow! Make sure to visit Dana’s blog  to see what she made with the goodies I sent her (that’s where I’m headed first!! ) then head back to Lori’s blog Pretty Things    to catch the rest of the hop!

And if you'd like to peek at my past soups you can always visit these pages

Bead Soup 5
Bead Soup 6 
Bead Soup 7


Thanks for stoppin by!

We’ll see ya next time!

Monday, May 5, 2014

While we wait....

As you may have noticed, no soup this weekend. We've had a slight postponement, the reveal will be this coming weekend May the 10th instead.

I thought then I might share a couple UFO's I managed to get finished this week - told you my muse wasn't ready to stop! lol

cluster earrings made of Smokey Quartz and Peridot gemstones w/14kt gold filled accents

Technically these earrings weren't a UFO as I had the gemmies (Smokey Quartz and Peridot) pulled to make them and the design decided on but I had not actually started on them. They've been on my desk since the Artisan Whimsy call for pieces using these colors for the next issue of Bead Chat. ummmm I didn't quite make that deadline, oops.

Glass beads and Pearls in warm rich coppery tones with copper accents and copper heart pendant.


This sweetheart however, was definitely a UFO. It has been sitting on my desk since welllll before Christmas. I love this necklace, but it just kept getting interrupted by life's little happenings. I also kept running out of jump rings. I tell you, I've sawn rings for it three times, once even drawing blood! But I still ran out!  Hand knotted glass pearls on cotton cord, it's extremely soft and supple. The jump rings at the clasp are soldered closed. Normally I would use unsoldered rings to make a safety break, but if enough force is used to require a break, the cording should give and the knotting should keep the majority of the beads from scattering across the floor. Hopefully we never find out!!

While, as usual, I did all the metal work the design is a variation on Leslie's seed bead bracelet found HERE, she kindly shared it a Bead Soup or two ago. It makes up VERY comfy and I have used a variation of it for several necklaces now.

Thanks for stoppin' by!
We'll see you next time!